How to hex edit addons (MODL chunks) to player models (FAQ)

In this forum you will find and post information regarding the modding of Star Wars Battlefront 2. DO NOT POST MOD IDEAS/REQUESTS.

Moderator: Moderators

Deviss
Master of the Force
Master of the Force
Posts: 3772
Joined: Tue Aug 12, 2008 7:59 pm
Projects :: Clone Wars Extended
Games I'm Playing :: BF2

How to hex edit addons (MODL chunks) to player models (FAQ)

Post by Deviss »

well after conversation with Mav i decided no make this tutorial, but after conversation with ThePanda i decide again make it also with suggestions of Darth_Spiderpig and Delta-1035 well there become!! :P

A) STEP 1: Getting right MODL chunk
B) STEP 2: Putting into our model
C) STEP 3: Adding Texture for our MODL chunk into new model


NOTE: as example i will hex edit DarthD.U.C.K. Holsters with DC-17 Version and ep3trooper as model so you will need them also need XVI32 Hex Editor

A) STEP 1: Getting right MODL chunk
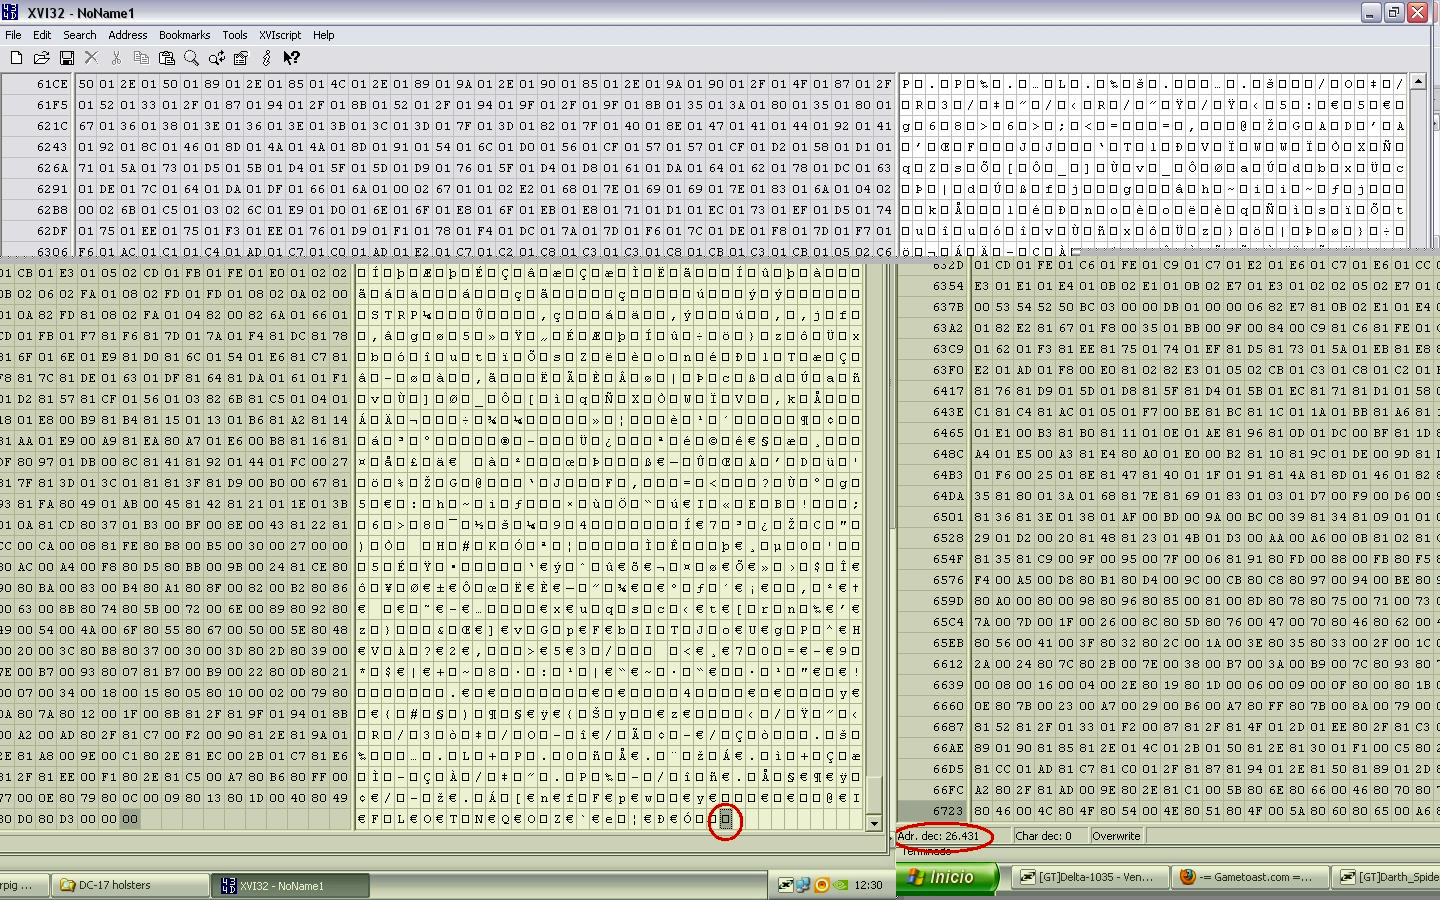
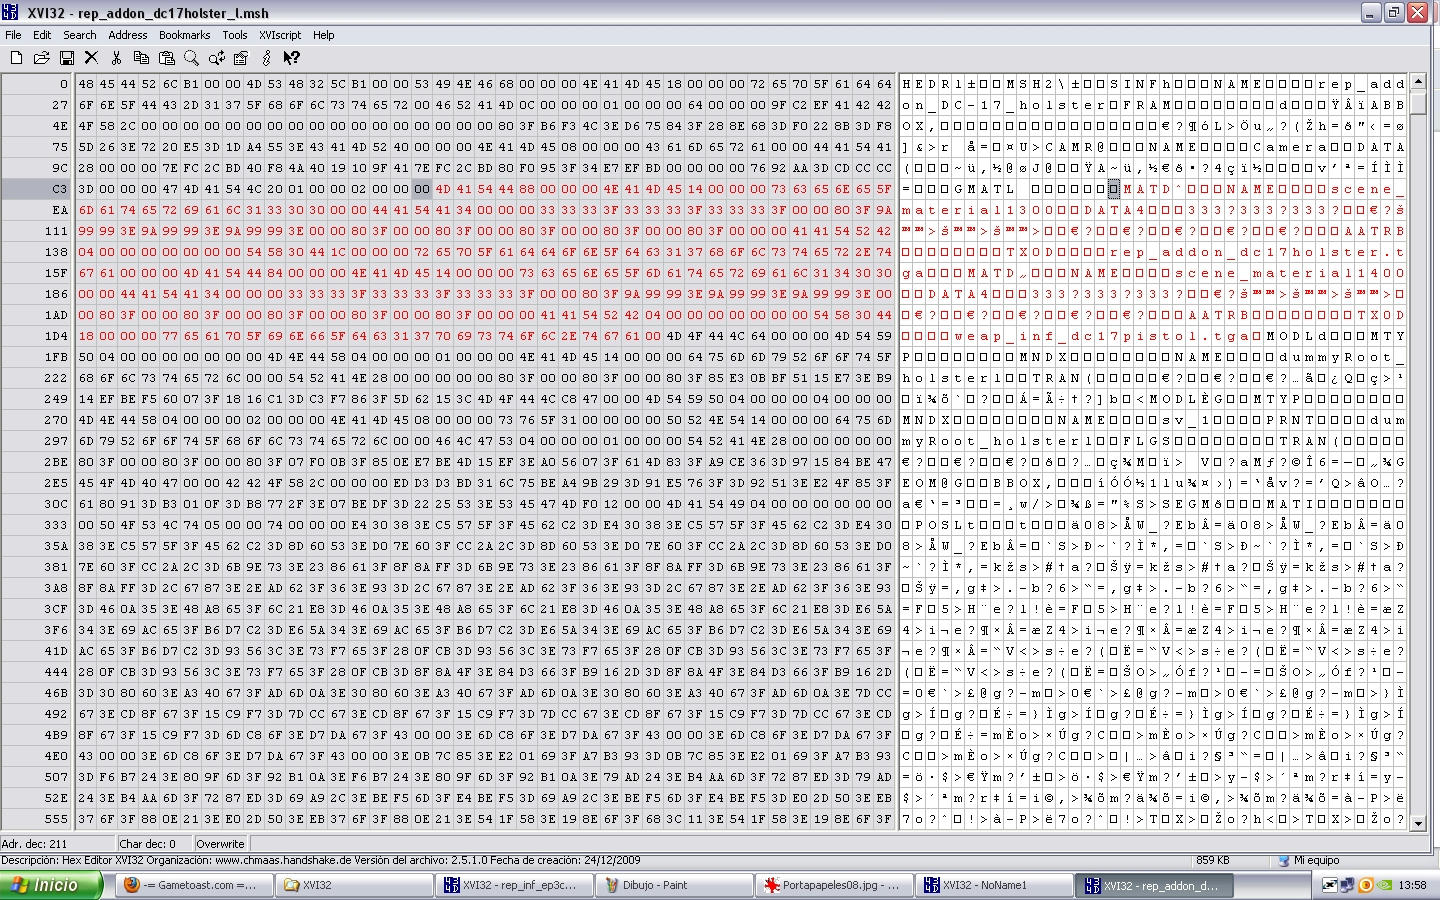
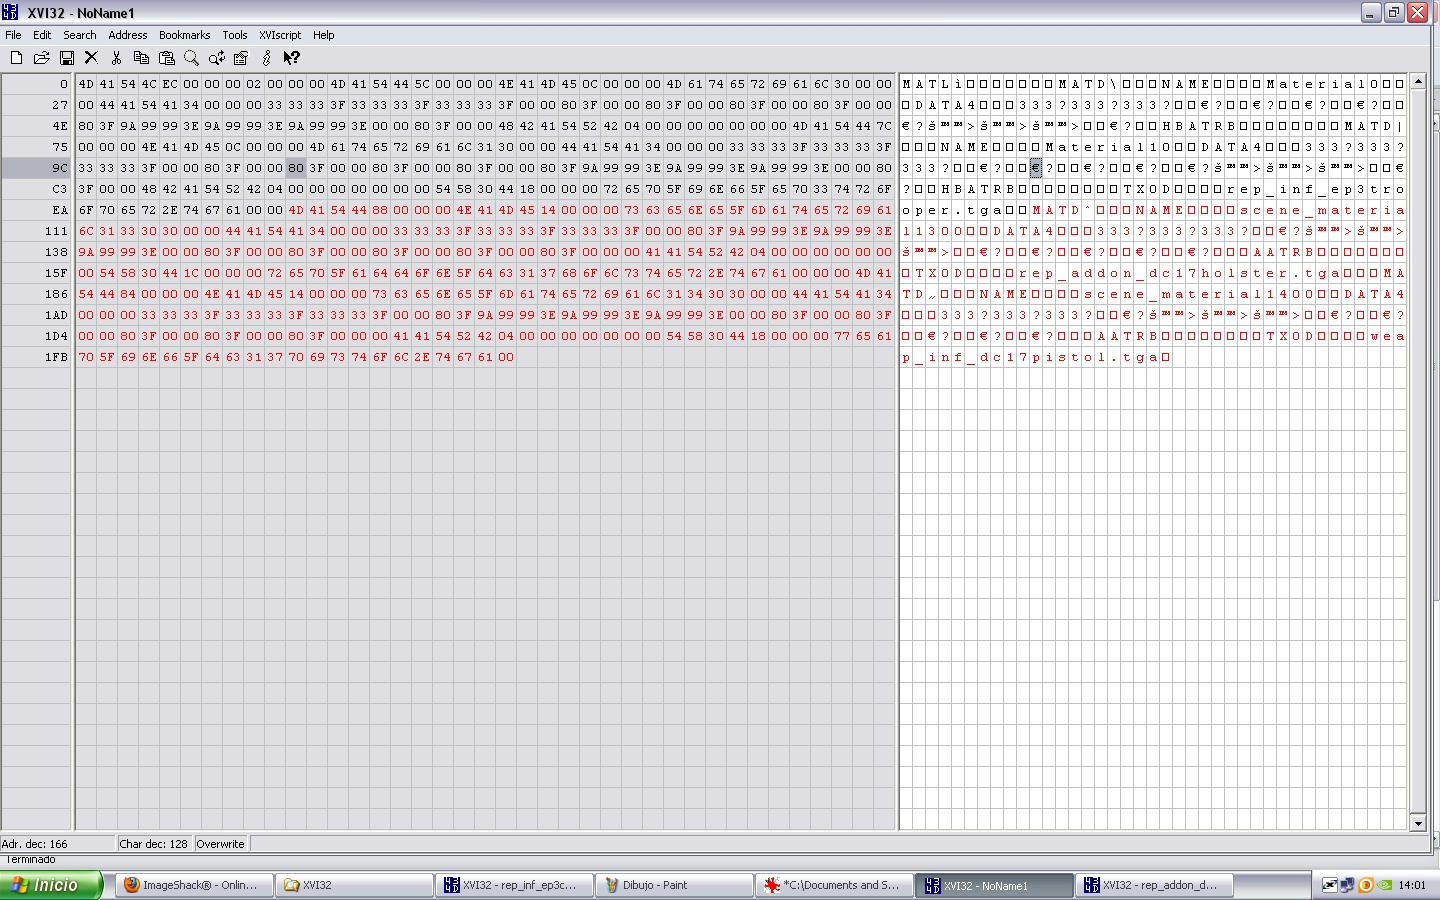
Open the file rep_addon_dc17holster_l.msh using XVI32, now we must find the correct MODL chunks so the First MODL called dummyroot_holster1 he isn't so go to the Second MODL is called SV_1 (this is the shadowvolume of holster for this reason say SV_ ) in this case we only want holster not his shadow so go to the Third MODL called Holster congratulation we found right one xD, but wait search next MODL (fourth MODL) is called Polymsh6 we must hex edit both MODL because MODL holster = holster and MODL polymsh6 = pistol part so we must select since the the M of MODL word of the Third chunk (remember called Holster) until letter previous to CL1L word in this case letter is one square so with Third and Fourth MODLs select (marked in red) press CONTROL + C (copy) and open new window of XVI32 go to FILE - NEW and press CONTROL + V (paste) , into new window where you pasted them go to last letter (one square) and remember the number of Adr. dec. in this case is 26431
Hidden/Spoiler:
Image
previous to save new file go to first MODL chunk (in old file was the Third MODL chunk called Holster) and after word PRNT is called dummyroot_holster1 we must rename it to the bone this will be attached in this case bone_l_thigh so only write on it, and will be appear letters we no need (lster1 in number is 6C 73 74 65 72 6C)
Hidden/Spoiler:
Image
and that code into left windoe we must change them to 00 00 00 00 00 00 like this
Hidden/Spoiler:
Image
make the same process into PRNT of the second MODL chunk called polymsh6 ready now save as MODL holster 26431.msh

B) STEP 2: Putting into our model
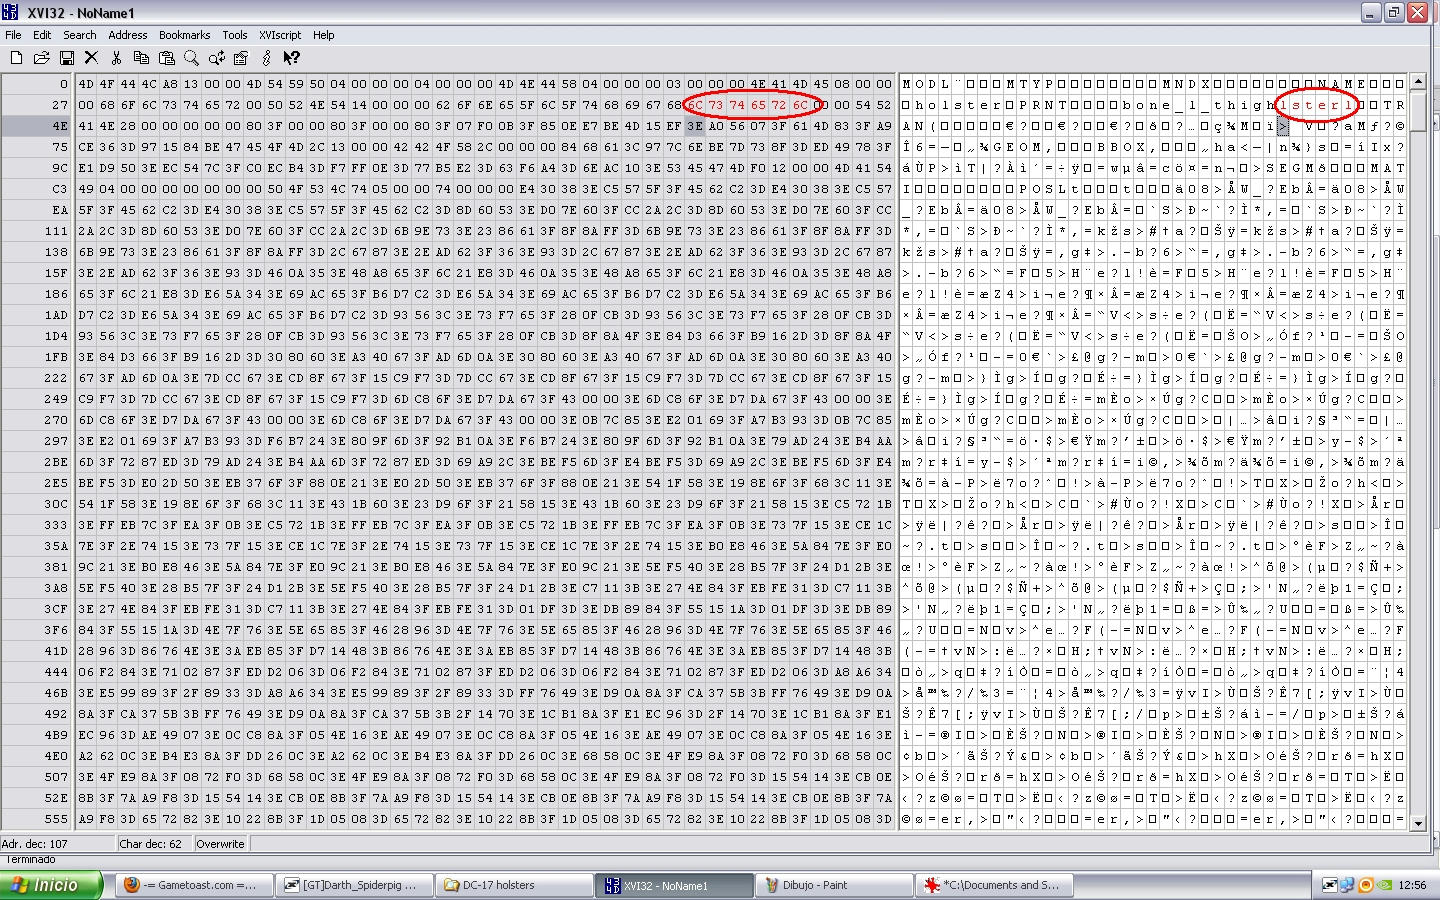
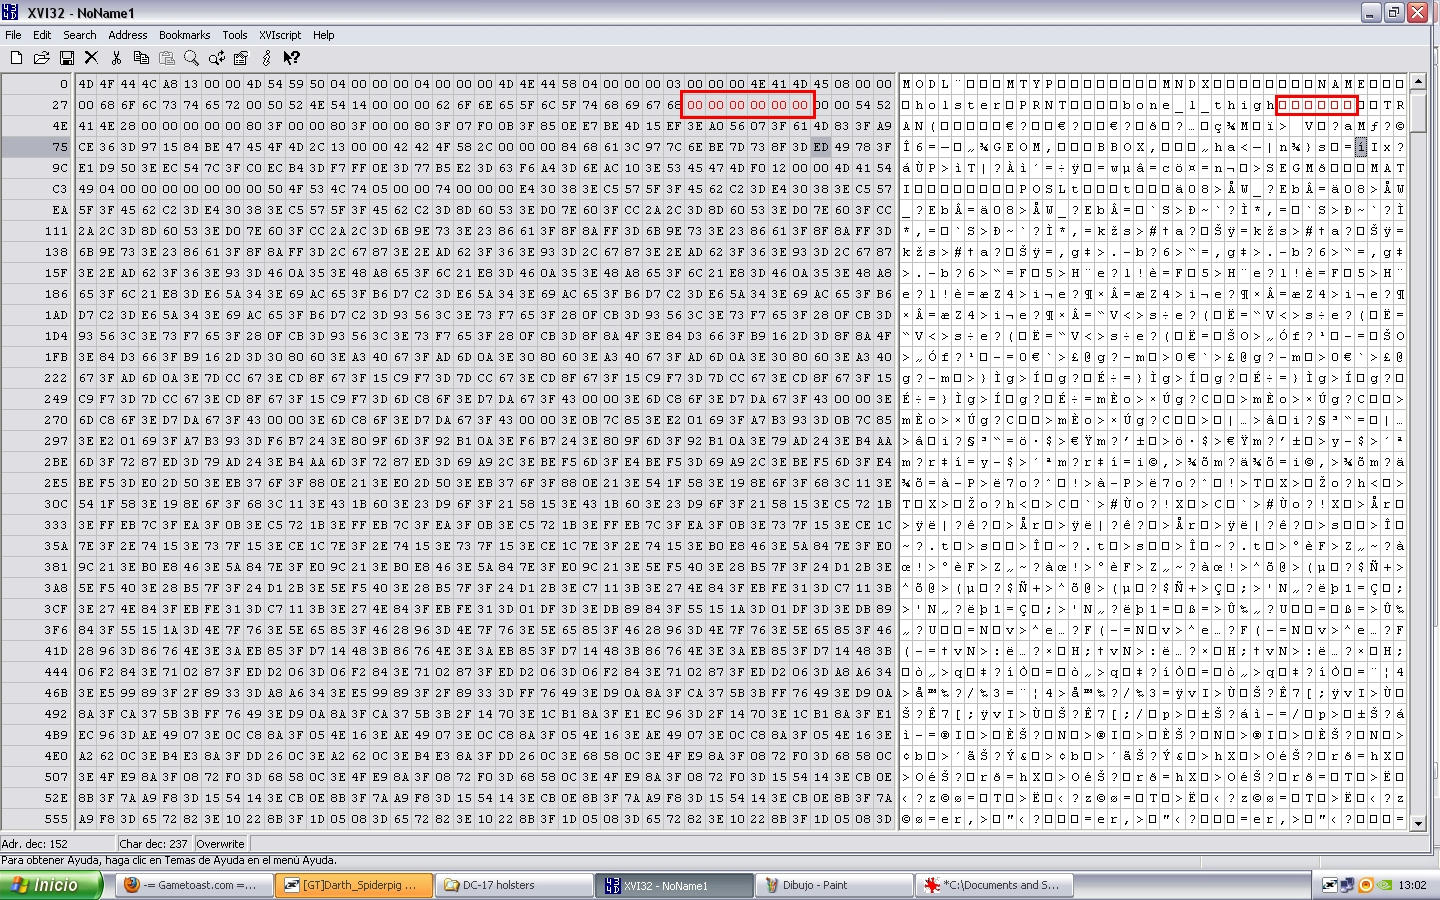
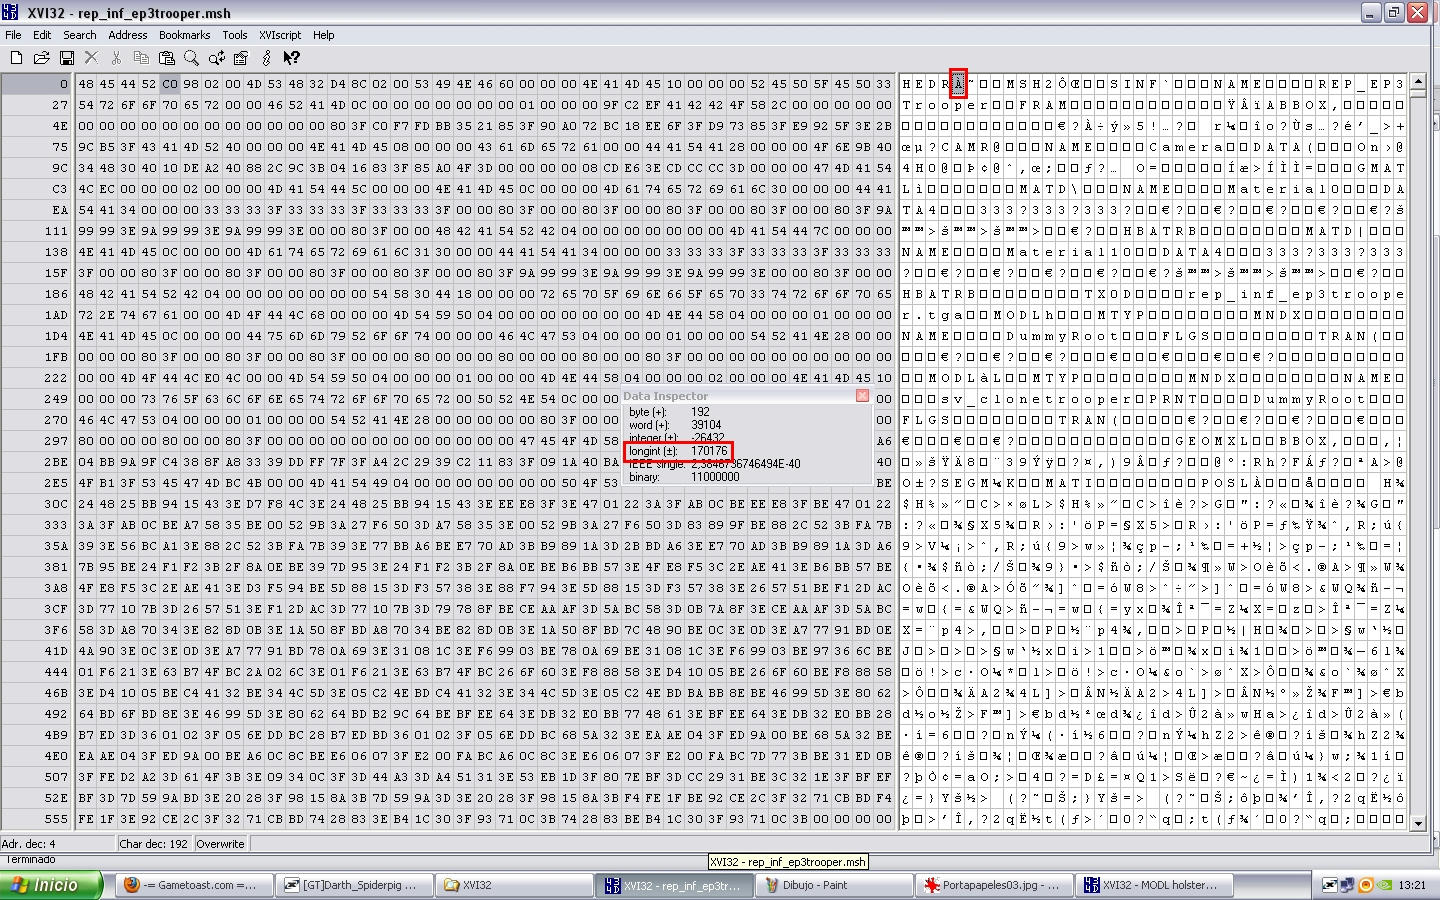
open the file MODL holster 26431.msh (our holster model) using XVI32 as always xD, select all (will appear all in red) and press CONTROL + C(copy) now in other XVI32 window open rep_inf_ep3trooper.msh and search the word bone_l_thigh search that word until you find the last appearing of word and put the cursor on the M of the next MODL chunk to it, (in this case called eff_l_calf) and been on the M press CONTROL + V (paste) so will past our holster model select previouly, now we must rezise encode number of HEDR & MSH2 so go to begin of the file where say HEDR and put the cursor into next letter to it and go to Tools --- Data Inspector pop up little windows so remember his Longint Number (170176)
Hidden/Spoiler:
Image
without close the little window put the cursor on next letter to MSH2 (167124)
Hidden/Spoiler:
Image
now yes close that little window and putting the cursor on next letter to HEDR go to Tools -- Encode Number and put this number:
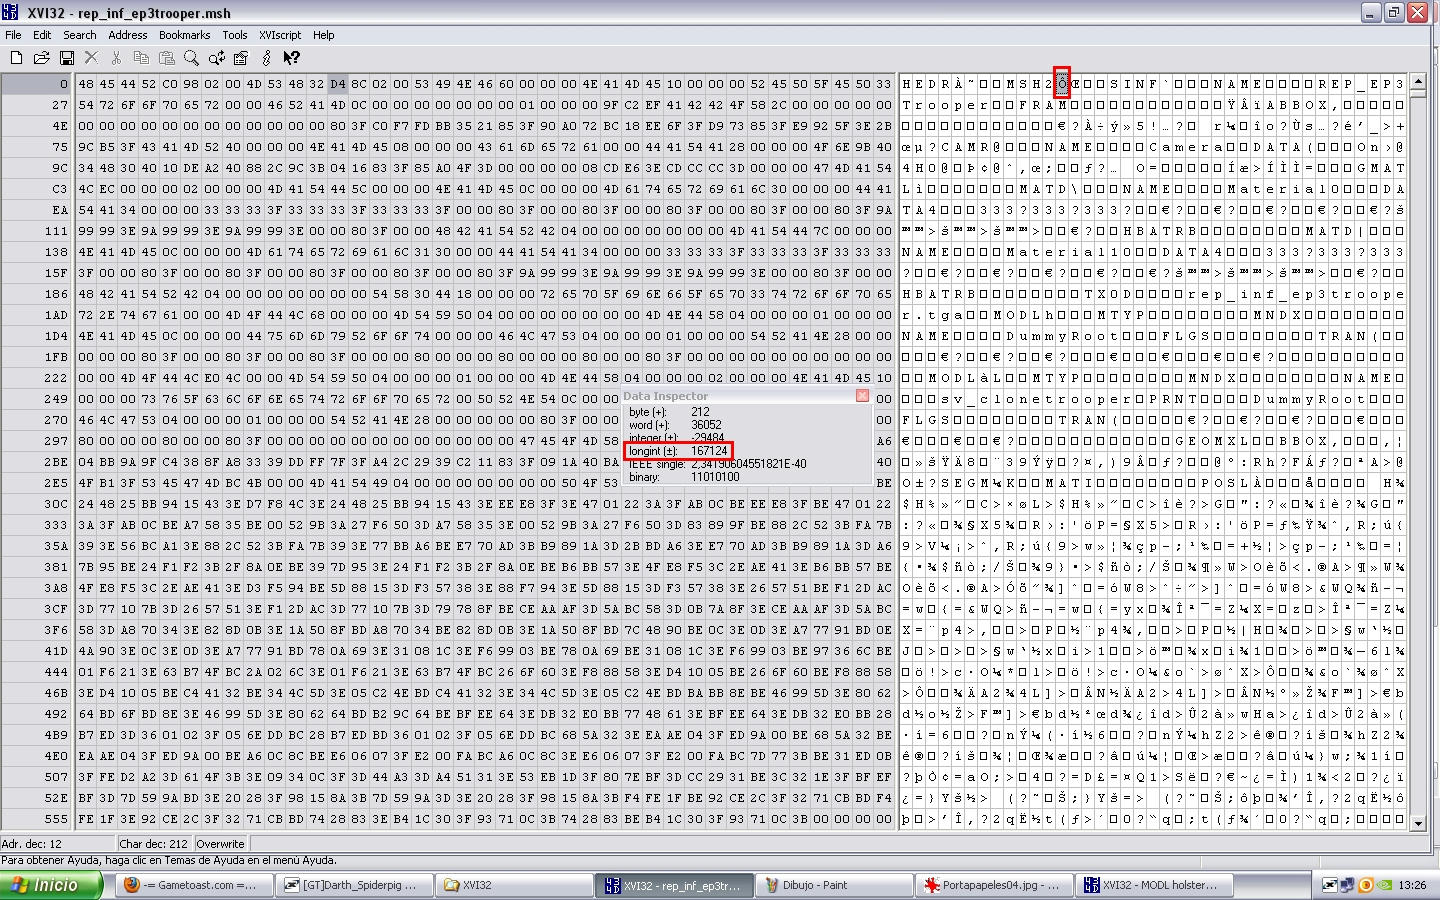
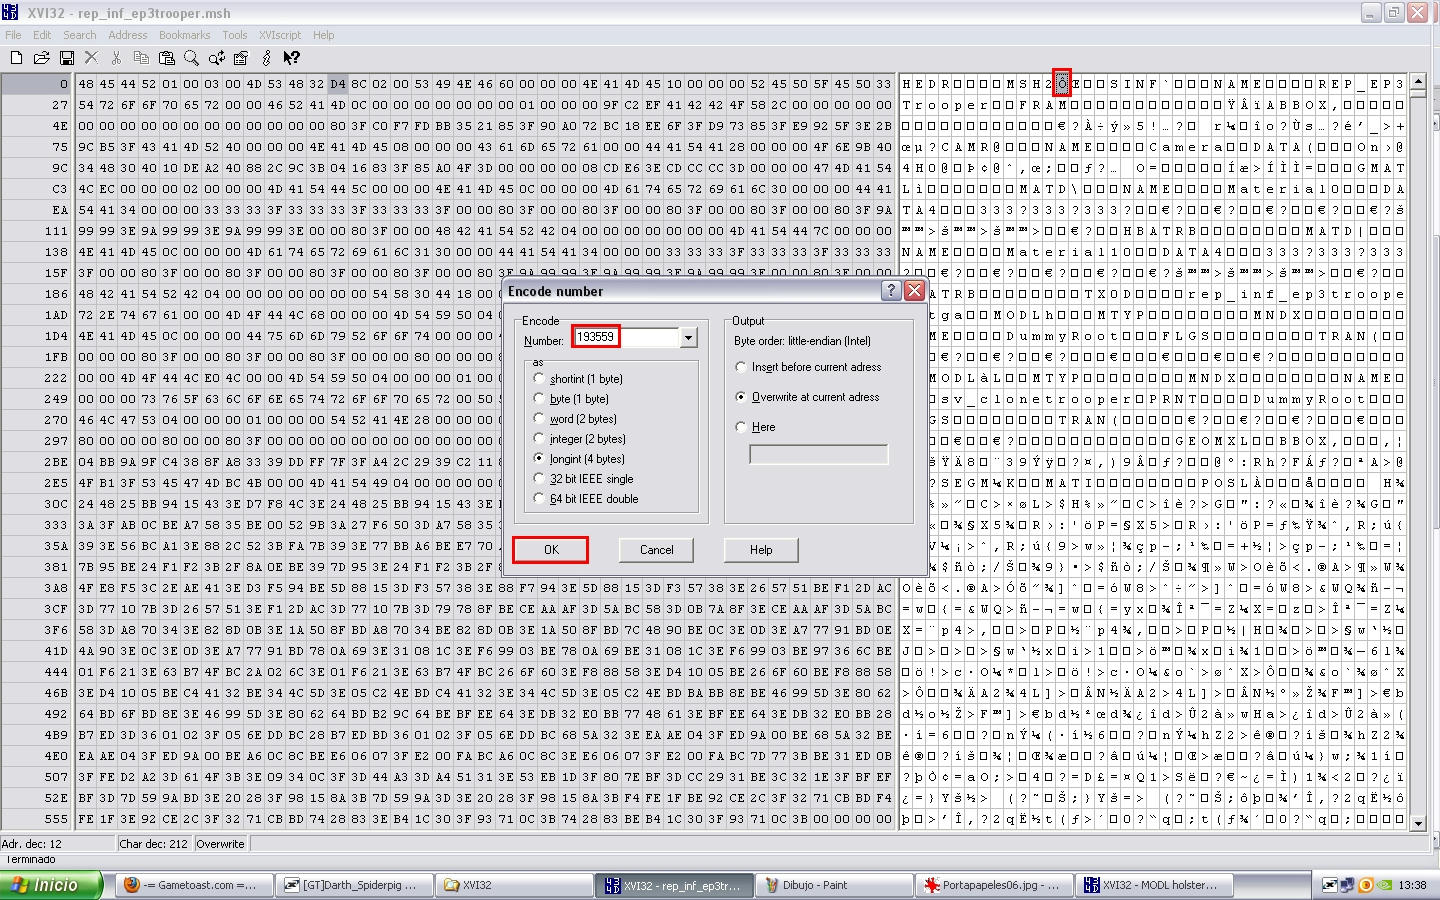
Longint(170176) + Model Number(26431) + 2(becase was 2 MODL chunks, Holster and Polymsh6) = 196609 and press OK
Hidden/Spoiler:
Image
now go to next letter to MSH2 and go to Tools -- Encode Number:
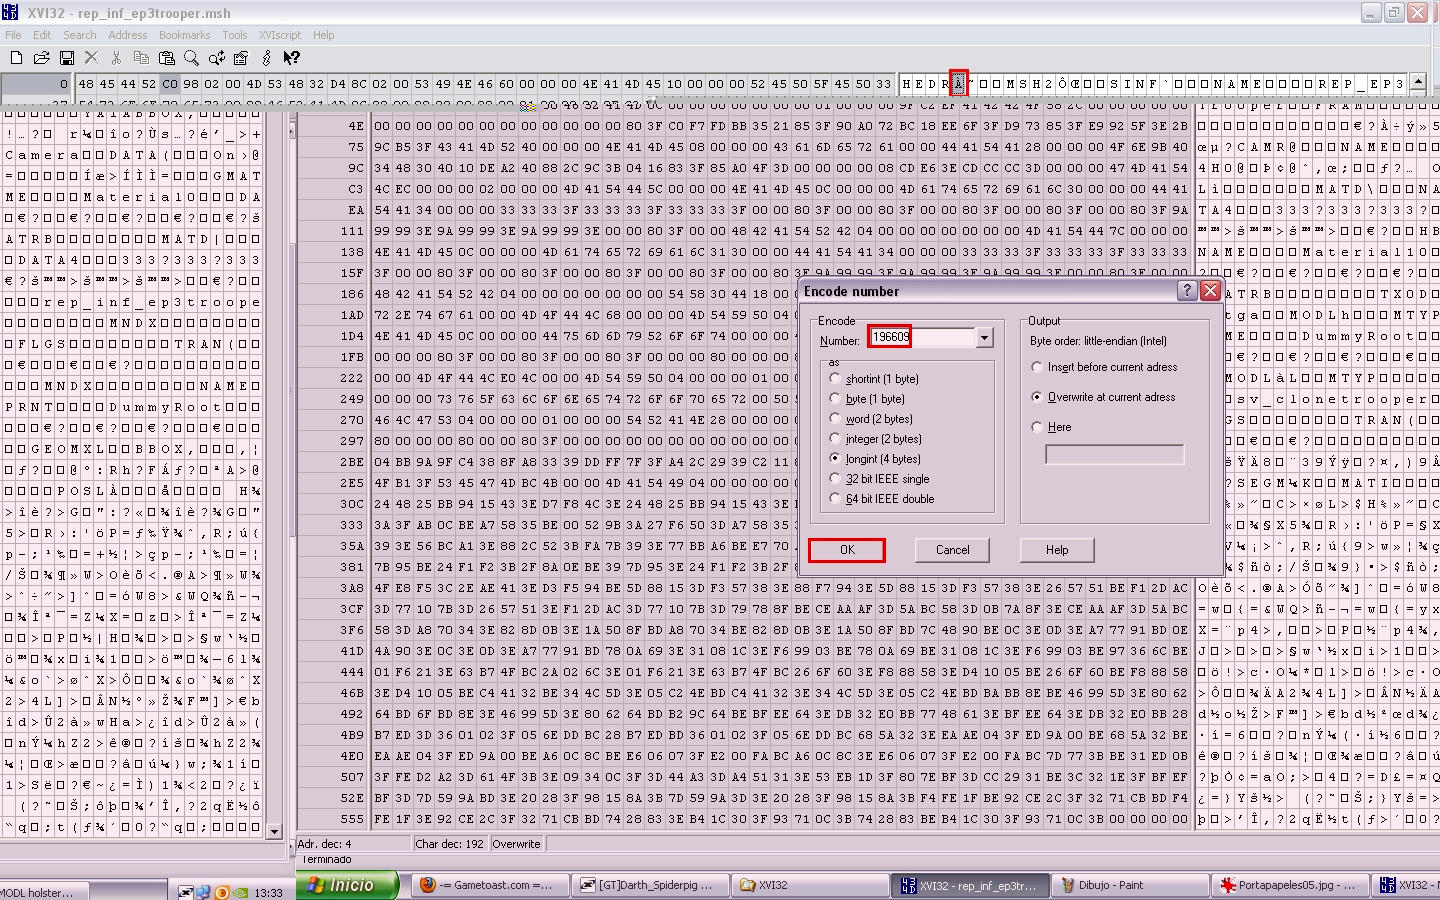
Longint(167124) + Model Number(26431) + 4(2 per each one MODL chunk and we added 2 MODL chunks Holster and polymsh6 and 2x2=4 lol) = 193559
Hidden/Spoiler:
Image
ready now save as rep_inf_ep3commander.msh

C) STEP 3: Adding Texture for our MODL chunk into new model
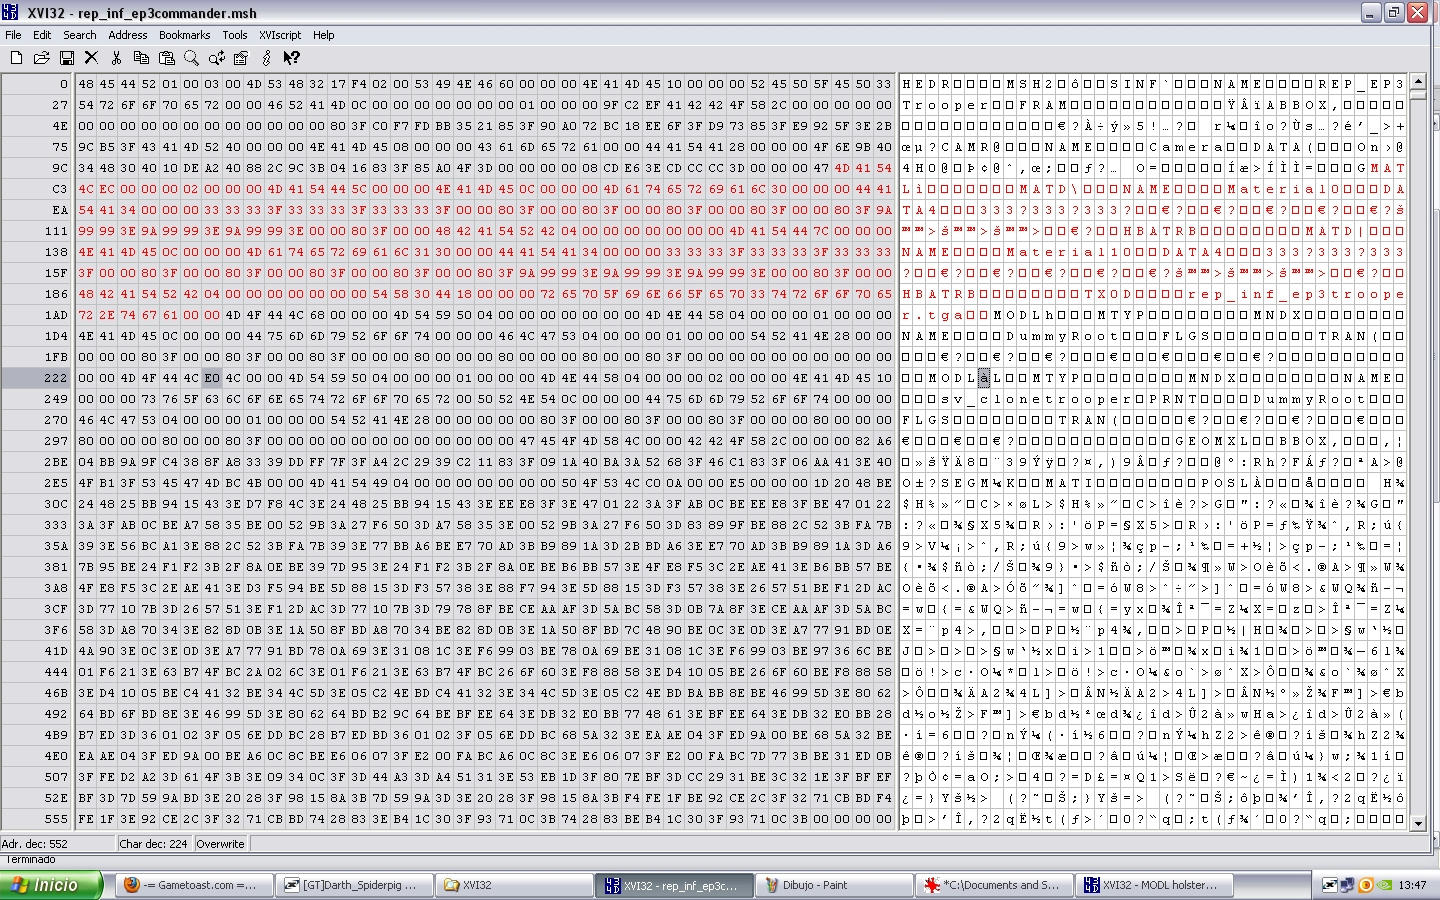
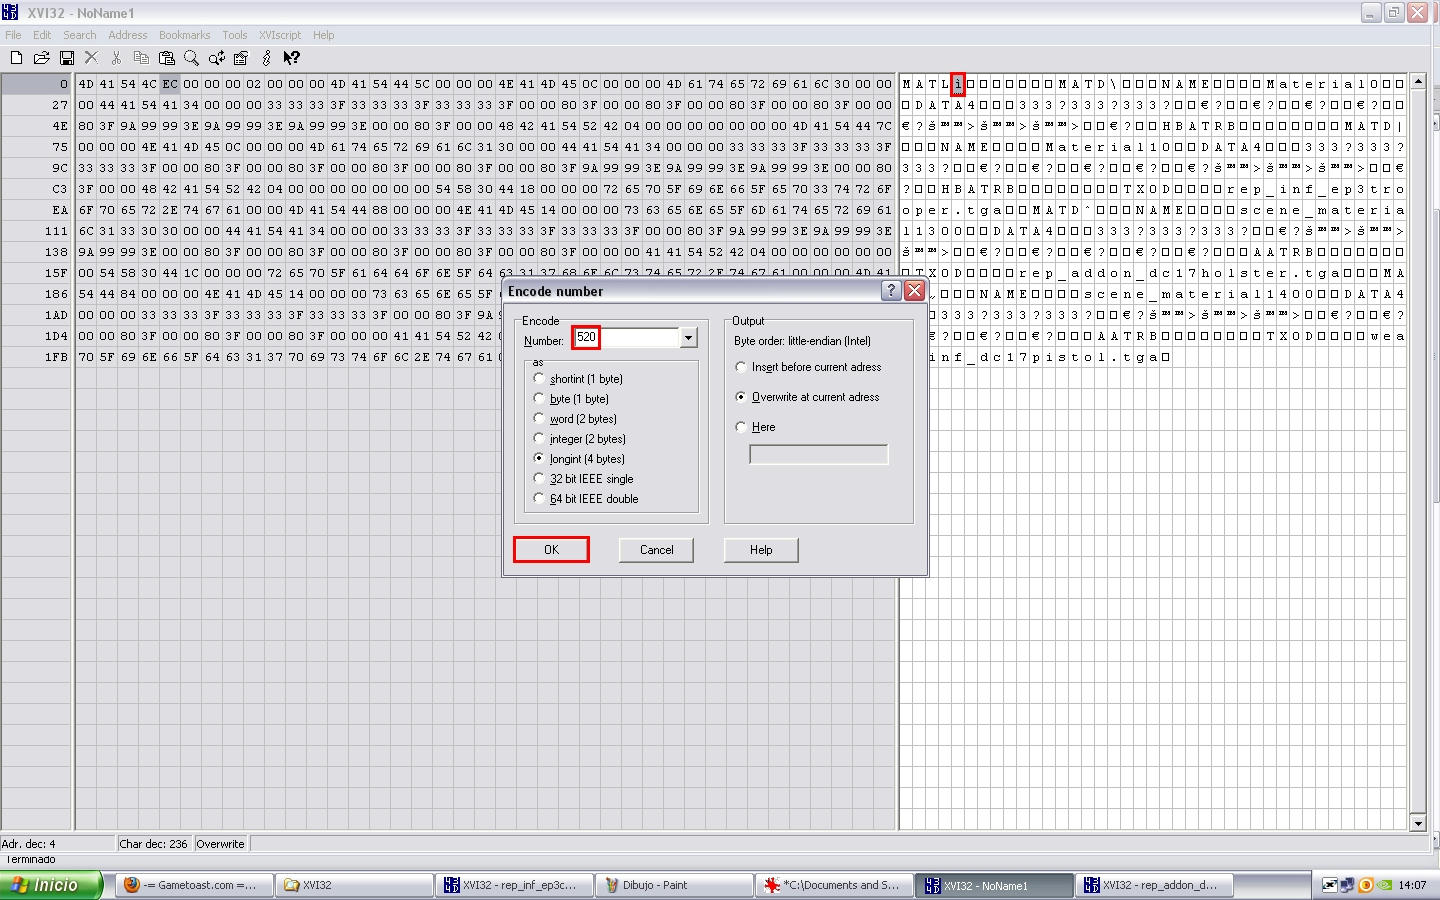
open the file rep_inf_ep3commander.msh using XVI32, put the cursor on M of MATL and select until letter previous to M of the first MODL word like this
Hidden/Spoiler:
Image
press CONTROL + X (cut) and open one new XVI32 window and paste it there, now into that new window with our MATL go to last letter and remember his Adr. dec.Number (243), now open other XVI32 window and on it open the file rep_addon_dc17holster_l.msh and copy since the M of MATD until previous letter to M of the first MODL word like this
Hidden/Spoiler:
Image
and paste them on our extracted MATL after last letter like this
Hidden/Spoiler:
Image
now we must resize our MATL because we added 2 MATDs, so in our modified MATL go to new last letter and remember his Adr. dec. Number (527) so go to next letter to MATL and go to Tools -- Encodenumber and put this number:
MATL Adr. dec.(527) - 7 (always 7, no reason) = 520 and press OK
Hidden/Spoiler:
Image
and after encode number we must change MATD Quantity so after MATL word into numer left window appear the codes: 08 02 00 00 02 00 00 00 we must change it to 08 02 00 00 04 00 00 00 (we changed 02 to 04 because we added 2 MATDs) now ready select all (since M of MATL until last letter) and press CONTROL + C (copy ) and go to our file where cutted Matl remember? well put the cursor on the M of GMODL and press CONTROL + V (paste) like this
Hidden/Spoiler:
Image
now we need resize HEDR & MSH2 you remember how no? so now jump put the cursor on next letter to HEDR encode number same as previous we made and put this number:
HEDR Longint(196609) - old MATL Adr. dec. (243 + 1) 244 + new MATL Adr. dec. (527 + 1) 528 = 196893
then put the cursor on next letter to MSH2 encode number same as previous we made and put this number:
MSH2 Longint(193559) - old MATL Adr. dec. (243 + 2) 245 + new MATL Adr. dec. (527 + 2) 529 = 193843
now save as rep_inf_ep3commander_ready.msh.
open that new file using XVI32 as always and search the MODL chunk called Holster and after you will find the MATI word and after that appear the next numbers on left window: 04 00 00 00 00 00 00 00 50 change it to 04 00 00 00 02 00 00 00 50 ready now go to search the MODL called polymsh6 and make the same but in this case change 04 00 00 00 01 00 00 00 50 to 04 00 00 00 03 00 00 00 50 save changes because:
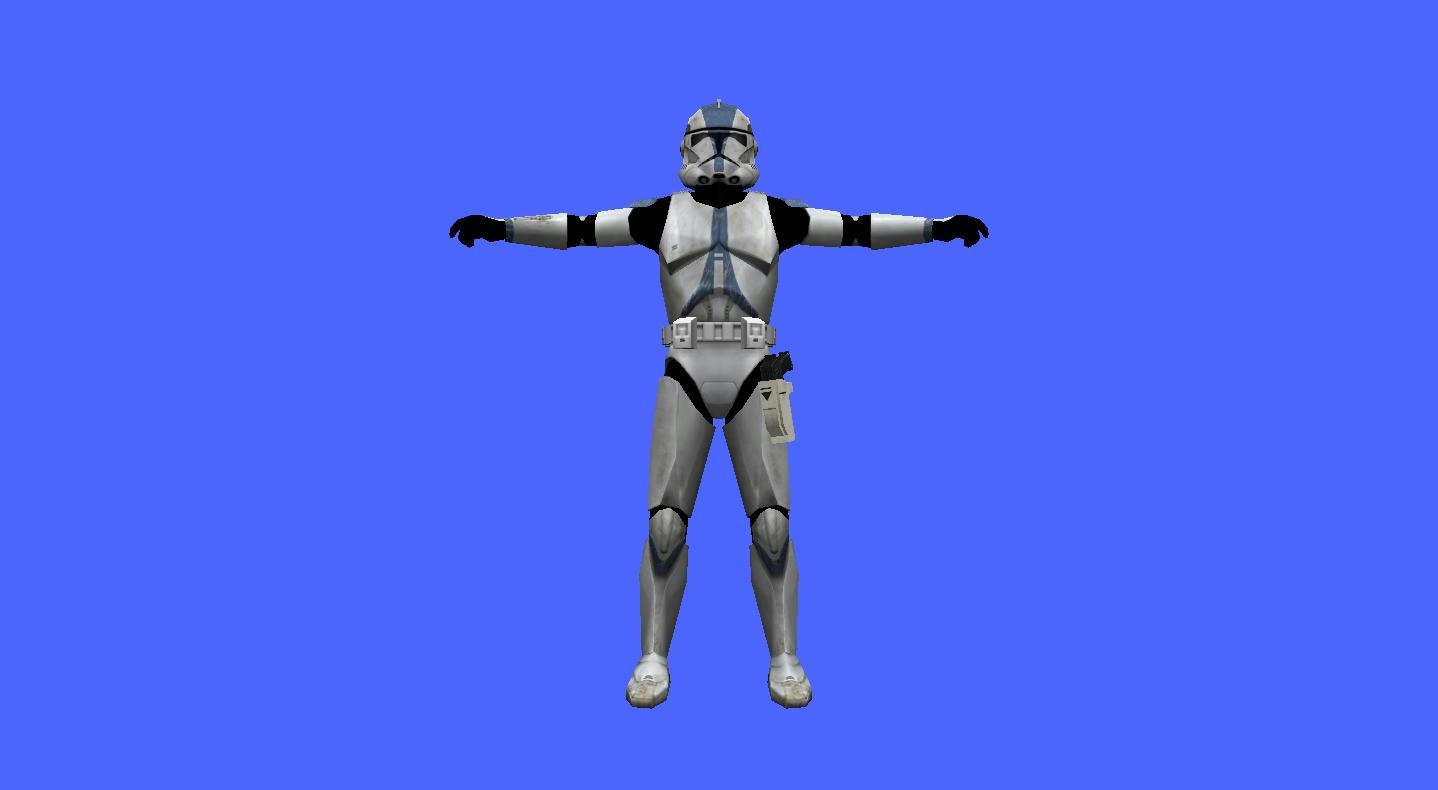
ALL DONE MAN!!

NOTE: little exaplain into last part of MATIs
MATL
MATD 0 ---
MATD 1 rep_inf_ep3trooper.tga
MATD 2 rep_addon_dc17holster.tga
MATD 3 weap_inf_dc17pistol.tga

for this reason into Holster MATI i said 02 and into polymsh6 MATI i said 03
Hidden/Spoiler:
Image
please my english is bad so if something is wrong explained or confuse please post comments suggestion :D

CREDITS:
* B.I.G_Cookie
* Darth_Spiderpig
* Delta-1035
* Fiodis
* ThePanda

* RepSharpShooter
Last edited by Deviss on Tue Jan 19, 2010 4:34 pm, edited 1 time in total.
Coley
Sergeant Major
Sergeant Major
Posts: 249
Joined: Sun Aug 09, 2009 11:27 am
Projects :: No Mod project currently.
Games I'm Playing :: I have not listed any games yet
xbox live or psn: No gamertag set
Location: Germany

Re: How Hex Edit Addons into Models

Post by Coley »

I am going to try this. What´s with RepSharpshooters old tut? too old?^^
Darth_Spiderpig
Sith Master
Sith Master
Posts: 2631
Joined: Fri Mar 27, 2009 10:23 am
Projects :: Something cool...
Games I'm Playing :: BF2 CoDBO BFBC2
xbox live or psn: Has no xbox....Yup
Location: Does whatever a Spiderpig does
Contact:

Re: TUTORIAL: How Hex Edit Addons into Models

Post by Darth_Spiderpig »

Coley wrote:I am going to try this. What´s with RepSharpshooters old tut? too old?^^
Maybe...or he didn't like it/found it too complicated or whatever. :P


W00, my first possibility to hex edit modl chunks :D

Thanks DEV', I will check it out now. :thumbs:
Coley
Sergeant Major
Sergeant Major
Posts: 249
Joined: Sun Aug 09, 2009 11:27 am
Projects :: No Mod project currently.
Games I'm Playing :: I have not listed any games yet
xbox live or psn: No gamertag set
Location: Germany

Re: TUTORIAL: How Hex Edit Addons into Models

Post by Coley »

:D
btw, I didn´t understand (typically for me) repsharpshooters tutorial, so I thank you. Maybe I´ll get it work with this tut, too.
(My english is bad, too. Where do you come from, dev?)
Deviss
Master of the Force
Master of the Force
Posts: 3772
Joined: Tue Aug 12, 2008 7:59 pm
Projects :: Clone Wars Extended
Games I'm Playing :: BF2

Re: How Hex Edit Addons into Models

Post by Deviss »

Coley wrote:I am going to try this. What´s with RepSharpshooters old tut? too old?^^
RepSharpShooter tutorial is only for Cloth and for me was so many difficult for understand xD, maybe because haven't images ? :P
Darth_Spiderpig wrote:
Coley wrote:I am going to try this. What´s with RepSharpshooters old tut? too old?^^
Maybe...or he didn't like it/found it too complicated or whatever. :P


W00, my first possibility to hex edit modl chunks :D

Thanks DEV', I will check it out now. :thumbs:
yeah if you have troubles or problems say me ;)
Coley wrote::D
btw, I didn´t understand (typically for me) repsharpshooters tutorial, so I thank you. Maybe I´ll get it work with this tut, too.
(My english is bad, too. Where do you come from, dev?)
Argentina XD
User avatar
Delta-1035
Sith Master
Sith Master
Posts: 2651
Joined: Mon Aug 04, 2008 10:32 am
Projects :: TOR GCWII GCW1035 BF1035
xbox live or psn: Johnny_Sciroppo
Location: Pizza Land

Re: TUTORIAL: How Hex Edit Addons into Models

Post by Delta-1035 »

Cool, you did it! I'll try this out for sure. :)
MandeRek
Sith Master
Sith Master
Posts: 2766
Joined: Tue Oct 02, 2007 10:51 am
Projects :: Battlefront Zer0
Games I'm Playing :: SWTOR
xbox live or psn: No gamertag set
Location: Ghosting around GT
Contact:

Re: TUTORIAL: How Hex Edit Addons into Models

Post by MandeRek »

I'ld rather import, modify, re-envelope, weight and export the model :P But that's just my opinion! Good tut, don't forget RepSharpshooter in the credits? :thumbs:
User avatar
ThePanda
Private Second Class
Posts: 74
Joined: Sat Dec 20, 2008 4:22 pm

Re: TUTORIAL: How Hex Edit Addons into Models

Post by ThePanda »

:thumbs: you finally put it up :P, good job! I've managed to hex edit a few things because of this and our xfire talk :).
Deviss
Master of the Force
Master of the Force
Posts: 3772
Joined: Tue Aug 12, 2008 7:59 pm
Projects :: Clone Wars Extended
Games I'm Playing :: BF2

Re: TUTORIAL: How Hex Edit Addons into Models

Post by Deviss »

MandeRek wrote:I'ld rather import, modify, re-envelope, weight and export the model :P But that's just my opinion! Good tut, don't forget RepSharpshooter in the credits? :thumbs:
well hex edit is the way i musted learn because no XSI lol, and well i already hex edit because don't know make cloth in xsi xd ouch you are right also i forgot credits to Fiodis because he explained touch me how hex edit kamas :P
ThePanda wrote::thumbs: you finally put it up :P, good job! I've managed to hex edit a few things because of this and our xfire talk :).
:D yeah thanks to you i decide post it :P
User avatar
CodaRez
Field Commander
Field Commander
Posts: 940
Joined: Mon May 25, 2009 6:49 am
Projects :: I would like one.....
Location: Ride around the world! And I won't give you anything :P

Re: TUTORIAL: How Hex Edit Addons into Models

Post by CodaRez »

MandeRek wrote:I'ld rather import, modify, re-envelope, weight and export the model :P But that's just my opinion! Good tut, don't forget RepSharpshooter in the credits? :thumbs:
Same

Would be even more true if I had a .msh importer that could do playermodels, its a hassle to keep asking.
Coley wrote::D
btw, I didn´t understand (typically for me) repsharpshooters tutorial, so I thank you. Maybe I´ll get it work with this tut, too.
Also same.

Its one of the main reasons why I don't hex-edit(couldnt understand tut), always got it wrong

Thnx DEV! May actually be able to hex-edit now! :mrgreen:
Deviss
Master of the Force
Master of the Force
Posts: 3772
Joined: Tue Aug 12, 2008 7:59 pm
Projects :: Clone Wars Extended
Games I'm Playing :: BF2

Re: TUTORIAL: How Hex Edit Addons into Models

Post by Deviss »

CodaRez wrote:Its one of the main reasons why I don't hex-edit(couldnt understand tut), always got it wrong

Thnx DEV! May actually be able to hex-edit now! :mrgreen:
yeah i needed bother to Fiodis per 1 months i belive with many PMs lol for understand tuto i belive Rep's tuto only need any images, and thanks Coda anyway your addons have 2 problems for me:
1) i can't open them with 3d object converter so i can't convert them to .obj
2) i can't hex edit them because always i tried munge process crash :S
RogueKnight
Space Ranger
Posts: 2512
Joined: Sat Nov 22, 2008 1:50 pm
Projects :: Life. Work.
Games I'm Playing :: League of Legends
xbox live or psn: No gamertag set
Location: Washington, US

Re: TUTORIAL: How Hex Edit Addons into Models

Post by RogueKnight »

Images! Win! Thanks a ton DEVISS, now I can Hex-Edit!
Deviss
Master of the Force
Master of the Force
Posts: 3772
Joined: Tue Aug 12, 2008 7:59 pm
Projects :: Clone Wars Extended
Games I'm Playing :: BF2

Re: TUTORIAL: How Hex Edit Addons into Models

Post by Deviss »

DarthRogueKnight wrote:Images! Win! Thanks a ton DEVISS, now I can Hex-Edit!
wow you are back :thumbs: , and thanks i hope everybody can understand and follow this tuto :D (i am not good teacher xD)
User avatar
CodaRez
Field Commander
Field Commander
Posts: 940
Joined: Mon May 25, 2009 6:49 am
Projects :: I would like one.....
Location: Ride around the world! And I won't give you anything :P

Re: TUTORIAL: How Hex Edit Addons into Models

Post by CodaRez »

DEVISS-REX wrote: 1) i can't open them with 3d object converter so i can't convert them to .obj
2) i can't hex edit them because always i tried munge process crash :S
I think its cus I use XSI 6, and not 7.5 (it always crashed and I don't know WHAT to do with graphics card/display settings whatever)

Either ways, I guess the solution would be to hex-edit everything else thats NOT mine onto a model and package the model with MY model as an addon msh(and include instructions)


*and if you want to hex-edit 2 of my models onto the same thing, I guess, tough :P
Deviss
Master of the Force
Master of the Force
Posts: 3772
Joined: Tue Aug 12, 2008 7:59 pm
Projects :: Clone Wars Extended
Games I'm Playing :: BF2

Re: TUTORIAL: How Hex Edit Addons into Models

Post by Deviss »

CodaRez wrote:
DEVISS-REX wrote: 1) i can't open them with 3d object converter so i can't convert them to .obj
2) i can't hex edit them because always i tried munge process crash :S
I think its cus I use XSI 6, and not 7.5 (it always crashed and I don't know WHAT to do with graphics card/display settings whatever)

Either ways, I guess the solution would be to hex-edit everything else thats NOT mine onto a model and package the model with MY model as an addon msh(and include instructions)


*and if you want to hex-edit 2 of my models onto the same thing, I guess, tough :P
cool thanks, if you want i could to be your exporter :)
Coley
Sergeant Major
Sergeant Major
Posts: 249
Joined: Sun Aug 09, 2009 11:27 am
Projects :: No Mod project currently.
Games I'm Playing :: I have not listed any games yet
xbox live or psn: No gamertag set
Location: Germany

Re: TUTORIAL: How Hex Edit Addons into Models

Post by Coley »

Emmm. Is it the same way like for cloth?

EDIT
Dev, I have a question...
From RepSHarpshooters tut:
Hidden/Spoiler:
3. Put your cursor at the way end and read the address on the bottom left. Put this in a calculator.
4. Place the cursor on the first byte of the long int directly after HEDR (address is 4, remember, counting starts at 0).
5. Read the long int number in the data-inspector. Add this to the number in the calculator, and add 1 to the sum (cause reading the cape started at 0, now we want to count starting at 1)
6. Got to tools > encode number and type the result of step 5 and check the long int box, make sure to overwrite at current address (press ok).
7. The number should be encoded in binary format now.
Which address? The character at the left bottom? But it isn´t a number, it is a character (A, I guess) :?
User avatar
Fiodis
Master of the Force
Master of the Force
Posts: 4145
Joined: Wed Nov 12, 2008 9:27 pm
Projects :: Rannoch + Tientia + Tools Programming

Re: TUTORIAL: How Hex Edit Addons into Models

Post by Fiodis »

Far left of the tool, outside the code box. I believe it should say something like Address: #.
Deviss
Master of the Force
Master of the Force
Posts: 3772
Joined: Tue Aug 12, 2008 7:59 pm
Projects :: Clone Wars Extended
Games I'm Playing :: BF2

Re: TUTORIAL: How Hex Edit Addons into Models

Post by Deviss »

Coley wrote:Emmm. Is it the same way like for cloth?

EDIT
Dev, I have a question...
From RepSHarpshooters tut:
Hidden/Spoiler:
3. Put your cursor at the way end and read the address on the bottom left. Put this in a calculator.
4. Place the cursor on the first byte of the long int directly after HEDR (address is 4, remember, counting starts at 0).
5. Read the long int number in the data-inspector. Add this to the number in the calculator, and add 1 to the sum (cause reading the cape started at 0, now we want to count starting at 1)
6. Got to tools > encode number and type the result of step 5 and check the long int box, make sure to overwrite at current address (press ok).
7. The number should be encoded in binary format now.
Which address? The character at the left bottom? But it isn´t a number, it is a character (A, I guess) :?
i marked in red circle on my images , he appear as Adr.dec. appear into corner left down :mrgreen:
User avatar
giftheck
Droid Pilot Assassin
Posts: 2218
Joined: Mon Jan 19, 2009 5:58 pm
Projects :: Star Wars Battlefront Anniversary

Re: TUTORIAL: How Hex Edit Addons into Models

Post by giftheck »

Obviously this tutorial applies also if you want to transfer mesh parts from one player model to another.

I tried to do that to put BF1 skirts on BF2 models (specifically, the new HD models). It looks fine in both SWBF MSH Viewer and in Ultimate Unwrap3d, but in-game the skirt hovers in front of the unit's right leg, facing the other way.

Here it is in MSH Viewer:

Image

There has to be more to it, possibly. I wonder what I did wrong to make it like that ingame. It least it was better than my other attempt though. I tried to hex-edit the ARC BF1 Kama and Paldron onto a Stormtrooper and it mucked up ingame big time. The entire thing just squashed. The skirt isn't squashing, it's just not where it's supposed to be.
Deviss
Master of the Force
Master of the Force
Posts: 3772
Joined: Tue Aug 12, 2008 7:59 pm
Projects :: Clone Wars Extended
Games I'm Playing :: BF2

Re: TUTORIAL: How Hex Edit Addons into Models

Post by Deviss »

ggctuk wrote:Obviously this tutorial applies also if you want to transfer mesh parts from one player model to another.

I tried to do that to put BF1 skirts on BF2 models (specifically, the new HD models). It looks fine in both SWBF MSH Viewer and in Ultimate Unwrap3d, but in-game the skirt hovers in front of the unit's right leg, facing the other way.

Here it is in MSH Viewer:
Hidden/Spoiler:
Image
There has to be more to it, possibly. I wonder what I did wrong to make it like that ingame. It least it was better than my other attempt though. I tried to hex-edit the ARC BF1 Kama and Paldron onto a Stormtrooper and it mucked up ingame big time. The entire thing just squashed. The skirt isn't squashing, it's just not where it's supposed to be.
well that kama is like from lowrez model ARC trooper bf2 xD maybe is that also bf1 and bf2 have different skeleton think
Post Reply