I always try to read all the topics on this forum and I also read all the reviews on maps on SWBFfiles. I came to the conclusion, that there seem to be a lot of people (mostly first mappers) who:
- A, don't understand the current tutorial on planning, or get the impression that it's very complicated.
B, are too lazy/hasty/too bold to even have a decent try at planning/barrier work
C, think that they are not important. THEY ARE!!!
I know there are several more sophisticated uses of dynamic uses of barriers, or other stuff, but I wanted to show everyone that you can achieve a lot of cool stuff with the basic uses. Thus, this tutorial can be followed with Zeroeditor ONLY (and visualmunge, duh)
I will show you ways to make AI:
- -follow pathings, so that they will never just stand around and do nothing
-Not walk into buildings
-Make them walk through narrow spots (alleys, but also entrances with an arch)
-Search for cover, whilst not getting stuck in it
-Take up a sniping spot, lay mines, jetjump
-Use stairs
-Do stuff that looks cool, but serves no real purpose (jumping, over things etc.)
Introduction:
(for newbies, but also a refresher for any mappers who don't understand everything completely)
The AI in Star Wars Battlefront II do not recognize height. That is why some find it hard to make elevated positions. However, you can make AI run under catwalks, though there is a chance the elevated AI get stuck in the wrong direction, or that the AI on the ground start to follow the planning of the bridge. Further explanations will be described below.
Planning:
- The basics, which allow you to guide your AI through you map. You make planning by drawing circles (hubs) and lines that run between them (connections). Planning has infinite heights.
You can specify which type of unit should follow which type of planning, by editing the connections.
If you make a wide map, using only planning can be enough, but I strongly recommend to use barriers as well
- They tell you where your AI can't go. They have infinite height as well, so keep that in mind. You can specify which type of unit has to follow them as well. Placing barriers is done by clicking on a point, then drawing a line by clicking on another point and then clicking on another point to make a rectangle.
- "They tell the AI stuff that they can do."
To be more specific, the AI in SWBFII are plain dumb. Because of this, it's up to you to tell them where they can find cover, from where they can snipe, lay mines, jetjump up and land.
You have to be careful as to where you point the arrow, since that describes the directions that they'll be more likely to look when they are using your node.
It is possible that the work that you put in barriers and planning and hint nodes takes as much/or even more time that you put in object placement. BUT THIS IS AS MUCH PART OF MAKING A MAP AS THE REST, MAYBE EVEN MORE.
I hope this is put to good use.
The uses:
Constructing basic planning.
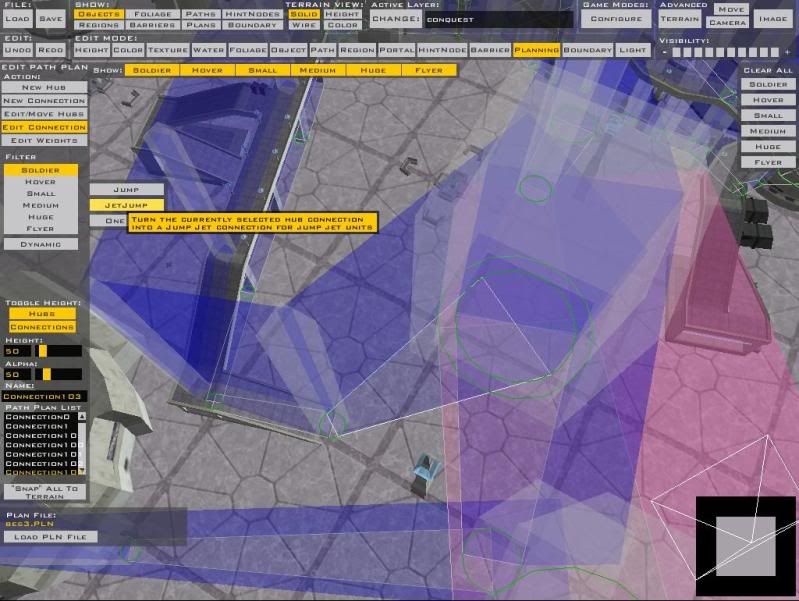
- -Go to edit mode -> Planning
You should see the following options:-Draw a New Hub by clicking once to set the middle of your hub, and the second for setting the width of your hub. You should place the hubs around the the spawn locations of your AI, and around the route that you want to have your AI follow:Hidden/Spoiler:-Then place connections between them (Top right, New Connection)Hidden/Spoiler:Remember, the AI will usually walk from hub to hub, using the connections. The pathing you make should always go in circles, never have a dead end! even when you would put an objective there, the AI will just walk past it.Hidden/Spoiler:
the right part is wrong:-Then, specify which connections can be followed by which type of unit, by clicking on "edit connection". (for example, you don't want a vehicle to try to drive through a narrow part:)Hidden/Spoiler:(Hint. The default Droideka's will follow the "soldier" connections.)Hidden/Spoiler:
-After changing the positions of objects in your map, keep in mind to keep your planning up to date as well.
(Hint. If there is (F.E.) a crate in the way of your planning, the AI will get stuck at first. If you place a barrier around it, the AI will have no problem navigating around them)
Done. These are the basics you need to know about planning. Hang in there though, there is still a chance that the AI will decide that the fastest route is not through the planning, but through buildings!
Constructing basic barriers.
- -Go to edit mode -> Barrier
You should see the following options:-Then start placing them around buildings. Keep in mind, every part of a building that sticks out of you barriers, is a place where an AI could possibly get stuck. BE AS PRECISE AS YOU CAN!Hidden/Spoiler:
Here are some examples on how you can place barriers around places where it needs to be as precise as can be (if you've got enclosed combat in an alley, and your barriers are sticking out to much, the AI see nowhere to go, so they get stuck:)You can use the "move" "rotate" and "stretch" options so that you don't have to delete a barrier if you're just millimeters of.Hidden/Spoiler:
Take some time for this. When I started, I had a hard time with this. Now, only just after the release of my first map, I can draw the barriers on the above pictures in one go, without changing them. Just to get you motivated)
-Then you can specify Which barrier should be followed by which unit. (that's very important if you are using flyers in your map, you want them stay within the boundaries of your map, but you also want them not to get stuck on barriers you placed around a crate that's on the ground)
Done. These are the basics you need to know about barriers. Hang in there though, your AI will not be "smarted up" yet, without the use of hint nodes.
Constructing basic uses of HintNodes.
- There are a lot of types of hint nodes, as described above. They have one thing in common though, and that is the fact that they make your AI look smart.
-Go to edit mode -> HintNode
You should see the following options:-Click on the ground, you'll see a cube appear, with an arrow sticking out of it. The cube is where the AI will stand when using the Hint Node, the arrow is the direction that it will be facing when using it.Hidden/Spoiler:
While having the Hint Node selected, press "type". A menu will appear, displaying the options you can give to a hintnode.
-For this example, press "Cover" and then "ok".
You'll see that the buttons beneath them have changed. I'll explain a short situation in which you'll use the "primary stance" and the "secondary stance". If you've got a cover where you have to stand behind, and where the main road is to the left, make the prim. stance be Stand, and the sec. stance Left. This will result in the following: The AI is walking nex to the cover. A shot is fired and he'll duck to the place where your hint node is positioned. He'll look around in the position that your arrow is facing and after deciding that the coast is clear, the AI will move to the left until it picks up a new Hub/Connection.
If you've got a cover where you can crouch behind, and still fire over it, select both "Stand" and "Crouch". This will give the AI more flexibility (he'll eather stand or crouch). It looks more realistic/cool if several AI stand and several are crouching.
Here is a list of possible Hint Nodes you can choose from, plus their options + what they do:
Type- Snipe
- options:
1: Primary stance
2: Mode. You can choose between "attack" "defend" and "both". Defend is best suited for when your sniper position is elevated and it has a good overview of the battle. Attack is best suitid for when you want your sniper to take a shot, and then move on. Both is the middle variant of them.
Jetjump/land- No options. This just tells an AI with a Jetpack where there is a good place to take off and where there's a good place to land.
Mine- Tells an AI where it can lay a mine. Don't use this too much, since it's very frustrating for human players. (though it is fair, a lot of human players like to spam mines themselves as well)
Keep in mind, the place where the mine is thrown is not on the spot where you place the node, but from the spot in the direction of the arrow.
I'm not sure about the function of the "target name". Could someone shed some light on this?
VehicleCover- Heavy variant of the regular cover. It will be used when the unit is attacked by a vehicle. (and you wouldn't want to let your AI take cover behind a box, but behind a solid where it can't be hit. Both for realism and gameplay reasons)
Fortification- It's a bit like "cover", only this can be used when the AI goal is to defend something. Instead of the AI going to the node when shot at and leaving it when they're not being shot at, on this node, they'll wait for any other enemies to pass by. (thanks to bobfinkl for pointing this out)
- options:
-You can turn the node around with x + middle mouse button, and move it with c + left/right mouse button.
Done. I think I'm going to call it a day now, I think that I'm going to continue this tomorrow, where I'll explain several fun stuff you can do with all of this. (like stairs and so on) - Snipe
To any admins: Feel free to edit this tutorial when I'm gone from gametoast (not saying that I am thinking about that anytime soon, but just in case so that it won't be necessary to write an all-new one.)