Skinning
Moderator: Moderators
-
ace_man777
- Recruit Womprat Killer
- Posts: 13
- Joined: Fri Aug 29, 2008 11:23 am
- Projects :: No Mod project currently.
- xbox live or psn: No gamertag set
Skinning
Hi, I Need Help Because I'm Completely New To Skinning And Modding But I Want To Know How To Make A Skin And If It's Possible To Rename The Units In A Skin, Or Change The Weapons. So If AnyOne Could Help Me I'd Appreciate It 
-
obiboba3po
- 2008 Most Technically Challenging Avatar
- Posts: 2376
- Joined: Tue Feb 12, 2008 7:46 pm
- Projects :: No Mod project currently.
- xbox live or psn: No gamertag set
- Location: NJ, USA
Re: Skinning
er....no offense but this has been posted a thousand and one times. for future reference, use the "everything you need to know thread" in the SWBF2 modding forum. but heres youre answer.
elfie's guide to skinning wrote:Greetings my friends! I assume that if you are reading this then you want to learn the art of skinning, no pun intended. Someone just recently posted that they want to learn how to skin and that none of the tutorials worked so here is one that hopefully will work. You will need a good program to do this like GIMP. Search it on google and download it. First let's start off with something easy to skin, like the rep side. Copy the rep and common side to your sides folder. Go to the rep's msh folder and open rep_inf_ep3trooper.tga with GIMP. Now get the color tools and skin away! When you are satisfied go to file new. Make the new file 512 by 512 pixels and press ok. Now you have a new blank file. Go to layer and click delete layer. Your file now looks like a chess board. Then go back to layer and click new layer. make sure the layer is 512 by 512 pixels. Now go back to the original clone skin you had and under edit click copy. Now go back to your blank skin and under edit click paste. Then go to layer and click anchor layer. Now save it as rep_inf_ep3trooper.tga and where it says all images, change that to targa file or tga. click save and yes you want to replace.
Now turn OFF RLE Compression! when your skin is saved you go to your clone wars lua and put dc: infront of side\rep. thank you for reading and hope this helps. Please post for comments/suggestions
-
ace_man777
- Recruit Womprat Killer
- Posts: 13
- Joined: Fri Aug 29, 2008 11:23 am
- Projects :: No Mod project currently.
- xbox live or psn: No gamertag set
Re: Skinning
dc?
-
Caleb1117
- 2008 Most Original Avatar
- Posts: 3096
- Joined: Sun Aug 20, 2006 5:55 pm
- Projects :: No Mod project currently.
- xbox live or psn: No gamertag set
- Location: X-Fire: caleb1117 ಠ_ಠ
Re: Skinning
Ugh, unformatted block of text tutorial.
We need a better one, neither of our skinning tut's are very good.
We need a better one, neither of our skinning tut's are very good.
-
SBF_Dann_Boeing
- Groove Walrus

- Posts: 1529
- Joined: Wed Aug 31, 2005 11:33 pm
- xbox live or psn: No gamertag set
- Location: An Igloo High Upon a Mountain Top
Re: Skinning
Read what Caleb Said. And then take a look at my extra instruction.
How to create a working *SKIN* for SWBF2 in a Custom Side
The Skinning Part:
If you have Photoshop, open the TGA file of the unit you want to skin. If you don't have Photoshop get GIMP.
Mess around with the skin in Photoshop or GIMP. Click File > Save as, and if you get an option for RLE compression, UNCHECK it. Then Save.
End Of the Skinning Part
Ok, Do all of that.Caleb1117 wrote:Bear with me, this could be painstaking, but I promise you, it gets easier. Well, alittle anyway.
Ok for the purpose of this tutorial, I will assume you have a functioning map in SWBF2 already. If not, then get cracking.
Now some of you may want to just edit a shipped side, but in this tut I’ll be teaching how to make a completely new one. It works pretty much the same way, except with a shipped side, your doing a lot more little patch work. Making small additions to get stuff working, but if you know the whole process, then you’ll know all the little things that are needed.
And… uhm Its just the way I’m doing so thar.
First decide what you want your side to be called, traditionally, they are something with only 3 characters, like ALL, IMP, or CIS, but this doesn’t have to be, you can name your side anything, I know of no limits.
So lets say, your making this for a super duper stormie trooper, you could name you side SDST... I suddenly find that anacronim annoying, so I won’t use it, the example side name will be: PMS >.> What?
Ok, so make a folder in Data_ABC/Sides, and name it PMS (IE whatever your side name is)
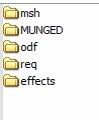
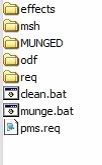
And then inside it, make a: effects, odf, msh, req, and MUNGED folders
(note that the MUNGED folder doesn’t need to be in caps, it just typically is.)
So it now looks like this:
Now go get the assets for your unit.
(make sure you only copy the original assets, and not modify them.)
This means get the all the TGAs, MSHs, weapon ODFs, and the unit’s ODF, that you want/need.
All MSHs and TGAs go in your sides msh folder, ODFs in the odf folder, etc.
If the unit you are changing is a Jedi, look in his sides MUNGED folder, and find grab all the files with his name on it, there should be one .anims, one .zaabin, and one .zafbin, move these into your sides MUNGED folder
Lets take another trip to the assets.
Go to Assets/Sides, and copy the common side to your Data_ABC/Sides.
If the tur side is in your Data_ABC/Sides, you can delete that, unless you plan on having turrets in your map at some point.
Ok, now to make the .reqs which stands for Required Files, every unit, vehicle, or hero (and even a few other things) in a side needs one, and then, the side itself needs one.
They are text files, and really easy to set up.
Ok first your unit(s) req.
Go into your side’s req folder, and make a text file, you should name it whatever then name of your unit is. So if your unit is called pms_inf_supr_tropr You should call the req file pms_inf_supr_tropr.req. Now its handy to look at a shipped .req, so you go do that, I’ll wait.
Done? Its really quite simple.
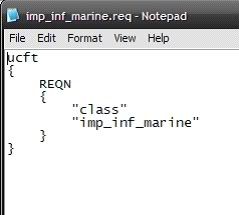
I suggest you just copy the text out of a shipped req, and paste it into your own and change the text about the unit. If you don’t understand, then you didn’t look.
That is a unit req, just copy it, and change the unit name to yours, req names must match that of the unit’s odf.
Save your new .req file, and that’s done.
Hit back, and go to your sides main directory, you remember, this place:
And make another text file, this will be the side’s req, give it the same name as your side, so it would be (in my example) pms.req.
Again, let’s look at a shipped side req.
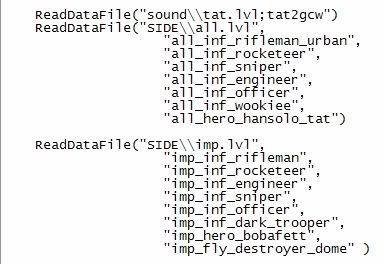
Here is the imperial one:
Cluttered looking isn’t it?
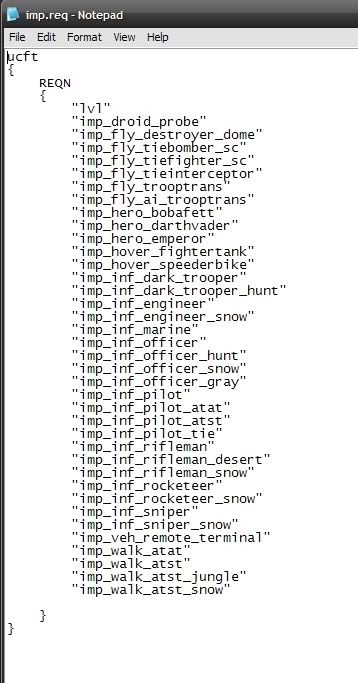
Basically, it just lists all the units, vehicles, and heroes etc
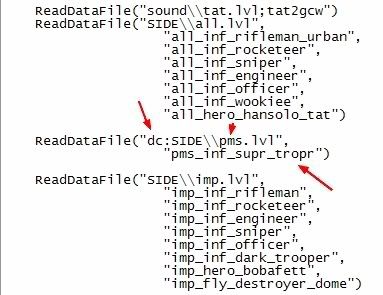
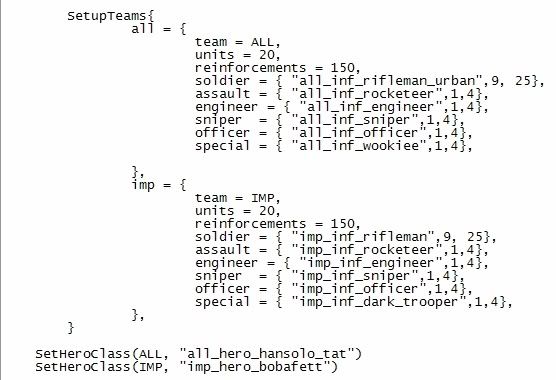
So copy one of the shipped side reqs into yours, and delete all the little units and such in quotes Except The “lvl” thing at the top of the list, then add your unit in so it looks like this:
And save it.
Your side should now be a bit more something like this:
(Ignore those .bat files, they weren't supposed to be there)
Just 2 things left
Go to Data_ABC/_BUILD/Sides and make a new folder for your side, this is where, the half munged side bits will go on their glorious metamorphosis into a .lvl file.
(if you don’t know what metamorphosis is, perhaps you’re to young to mod)
So, make a folder named PMS, then go to one of the other side folders in there, Data_ABC/_BUILD/Sides/ALL for example, and find two files called clean.bat and munge.bat, paste a copy of those two .bat files, into Data_ABC/_BUILD/Sides/PMS.
Last step adding your unit to the lua script.
Go to Data_ABC/Common/scripts/ABC there should be a bunch of files here, .lua and .bak.
The baks are just luas with their file extension changed, and are “backups” of the default luas.
You can delete these, I do.
Now you need to find the lua you want. The unit we’re talking about is a soldier, so lets put him in conquest.
Lua names start with your map name ABC then either a c for CW era, or g for GCW era.
And then the mode
con = Conquest
eli = Hero Assault
ctf = Capture the Flag
1flag = 1 Flag Capture the Flag
So lets put him in the GCW era, so find your ABCg_con.lua and open it, it’s a notepad file.
First scroll down and find this part.
This area of the lua loads a unit’s data into the game for use.
Again, we’re just going to kinda copy and paste a shipped bit.
Take the imp section, copy all of it and paste it again, in that section, change the lvl name from imp.lvl to pms.lvl, and put a dc: in front of SIDE, but before the parentheses, this dc: tells the lua that it is loading a custom file.
(if you where editing a shipped side, you would need to add a dc: to it’s load section too.)
And delete all the listed units, except for the top one, and change the name to your unit’s.
And close it off with a )
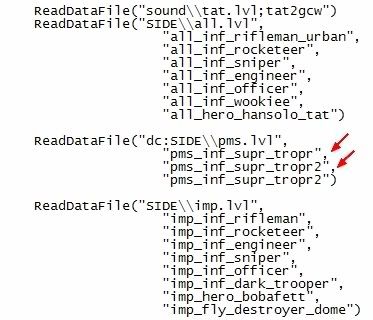
It should look a bit like this:
Now if you where adding more units, you would have to add comma’s like so:
Ok, now scroll down to the unit line up.
This bit:
Now if you could replace one of the normal unit’s with yours, but I’ll teach you how to add a new one, incase you don’t want to replace anyone, and hurt a trooper's feelings.
Under the SetHeroClass part, add this:
AddUnitClass(IMP, "pms_inf_supr_troopr",1,4)
This will add your unit under the Imperial side’s line up.
So now you’ve got this:
Good? Good.


The Skinning Part:
If you have Photoshop, open the TGA file of the unit you want to skin. If you don't have Photoshop get GIMP.
Mess around with the skin in Photoshop or GIMP. Click File > Save as, and if you get an option for RLE compression, UNCHECK it. Then Save.
End Of the Skinning Part
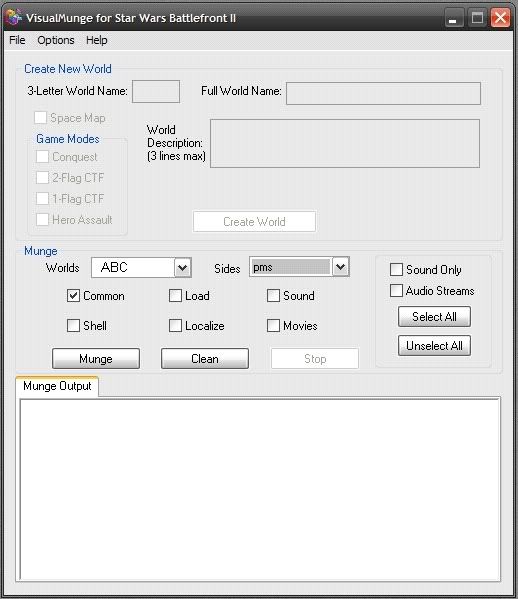
There. You should be familiar with Caleb's tutorial anyway before you even think about skinning.Caleb1117 wrote:Now we munge.
Go to: Data_ABC/_Build and click Modtools VisualMunge.exe.
Check the common box, and select your side from the drop down Sides menu.
Last edited by SBF_Dann_Boeing on Sat Aug 30, 2008 3:39 pm, edited 4 times in total.
-
epm01
- Master Sergeant

- Posts: 162
- Joined: Sat Jun 16, 2007 4:12 pm
- Projects :: No Mod project currently.
- xbox live or psn: No gamertag set
- Location: Cookie Land
Re: Skinning
Edit: Aww, Dann beat me to it....Well I spent long enough writing this so if theres anything that you don't understand in Dann's then check mine, xD.
SKINNING
As for actually skinning I would suggest using GIMP because its free and easy to use. I first started off with just taking out the Bucket fill tool and using Multiply to make it look a little less painty. Here's a picture of the two buttons in GIMP.

Save it as what the skin your replacing it with is called (This saves a tiny bit of time) and drop it in the sides msh folder in .tga format with RLE Compression OFF.
Now munge Common and BOOM your new skin should be working.
------------------------------------------------------------------------------------------
So its goes from:
To
So if you edit any skins then just add dc: infront of SIDE\\rep.lvl or whatever your side is called so that it works ingame.
------------------------------------------------------------------------------------------
Hope that helped. If I missed anything or there's something that you don't understand then please do ask.
Btw, Dann he was just asking how to skin and get it to work ingame not completely making a new side, Reskinnning is alot easier than creating a new side because you can just replace the original skin with the new one and have it named what the other one was, only if your adding a new unit would you change the sides.
SKINNING
As for actually skinning I would suggest using GIMP because its free and easy to use. I first started off with just taking out the Bucket fill tool and using Multiply to make it look a little less painty. Here's a picture of the two buttons in GIMP.

Save it as what the skin your replacing it with is called (This saves a tiny bit of time) and drop it in the sides msh folder in .tga format with RLE Compression OFF.
Now munge Common and BOOM your new skin should be working.
------------------------------------------------------------------------------------------
It means that in the .lua of your map you have to put in dc: infront of the side that your calling so that Visual Munge or whatever notices that something in this side has been edited (I think).dc?
So its goes from:
Code: Select all
    ReadDataFile("SIDE\\rep.lvl",
                             "rep_inf_ep3_rifleman",
                             "rep_inf_ep3_rocketeer",
                             "rep_inf_ep3_engineer",
                             "rep_inf_ep3_sniper",
                             "rep_inf_ep3_officer",
                             "rep_inf_ep3_jettrooper",
                             "rep_hover_fightertank",
                             "rep_hero_anakin",
"rep_hover_barcspeeder")Code: Select all
    ReadDataFile("dc:SIDE\\rep.lvl",
                             "rep_inf_ep3_rifleman",
                             "rep_inf_ep3_rocketeer",
                             "rep_inf_ep3_engineer",
                             "rep_inf_ep3_sniper",
                             "rep_inf_ep3_officer",
                             "rep_inf_ep3_jettrooper",
                             "rep_hover_fightertank",
                             "rep_hero_anakin",
"rep_hover_barcspeeder")------------------------------------------------------------------------------------------
Hope that helped. If I missed anything or there's something that you don't understand then please do ask.
Btw, Dann he was just asking how to skin and get it to work ingame not completely making a new side, Reskinnning is alot easier than creating a new side because you can just replace the original skin with the new one and have it named what the other one was, only if your adding a new unit would you change the sides.
Last edited by epm01 on Sun Aug 31, 2008 9:03 pm, edited 2 times in total.
-
elfie

- Field Commander

- Posts: 931
- Joined: Fri Jan 25, 2008 8:26 pm
- xbox live or psn: no live
- Location: Coruscant, Jedi Temple
- Contact:
Re: Skinning
Wow guys, nice tutorials! Those totally own mine! Just so you know, if you are creating skins you may also want to lower the file size. That can be done this way:
(B.
Modified from the Original tut created by MasterSaitek009[/hide]MasterSaitek009 wrote:So you want a way too make the file size smaller? How would you like to do this?
There are few ways.
(A.Hidden/Spoiler:
(B.
Hidden/Spoiler:
-
ace_man777
- Recruit Womprat Killer
- Posts: 13
- Joined: Fri Aug 29, 2008 11:23 am
- Projects :: No Mod project currently.
- xbox live or psn: No gamertag set
Re: Skinning
Thanks For The Help