- Make sure you know how to make 3D models in XSI or a different program and export to msh.
- Make sure you know how to import/export between XSI and another modeling program (like blender) if you are using it.
- Have some knowledge of the mod tools.
- Have a map script to add the reticule to (this method won't work for simple side mods, only era mods).
How to make a custom reticule in battlefront 2:
- Navigate to data_MOD\Common\mshs. Locate these files:
- hud_main_reticule.msh - The main reticule circle.
- hud_main_reticule_bullseye.msh - The square in the middle of the reticule.
- hud_main_reticule_criticalhit.msh - The hitmarker for headshots.
- hud_main_reticule_hit.msh - The hitmarker for normal shots.
- hud_main_reticule_outline.msh - The black outline around the main reticule circle.
- Import hud_main_reticule.msh into XSI as a base. If needed, export as an OBJ to blender or another program.
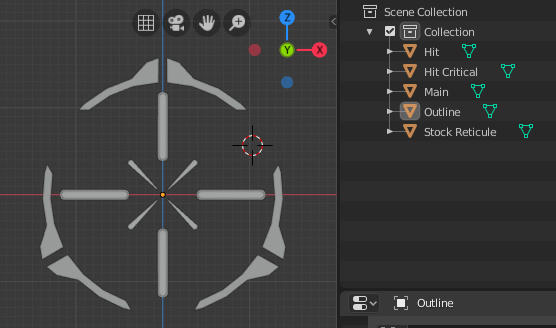
- Model each part of the reticule you wish to change as a separate object. I made each part in blender as different objects as an example:
- Export each new reticule part as a separate msh file. Make sure you triangulate and assign the same material as the stock reticule before you export.
- Overwrite the corresponding existing files in data_MOD\Common\mshs with your custom ones. Keep a backup of the old ones just in case.
- Make a backup and open the file data_MOD\Common\ingame.req. Replace all the text in it with the following:
Code: Select all
ucft { REQN { "model" "hud_main_reticule" "hud_main_reticule_bullseye" "hud_main_reticule_hit" "hud_main_reticule_outline" "hud_main_reticule_criticalhit" } } - Navigate to your custom map (or stock map) script that you wish to add the reticule to. Find this line:
Code: Select all
ReadDataFile("ingame.lvl") - Above it, add this line: (make sure you keep the original line)
Code: Select all
ReadDataFile("dc:ingame.lvl") - Run the VisualMunge or other munge program you have. Make sure you have "Common" checked before you munge.
- After you munge, copy the file data_MOD\_LVL_PC\ingame.lvl to <Game DIR>\GameData\addon\MOD\data\_LVL_PC.