Skinning Sides
Moderator: Moderators
-
CarbineImpulse
Skinning Sides
Well they say a change is as good as a rest and so I'm taking time out from making a new vehicle to sort out the look of teams. Ok well here's the basic situation, I want my map to be clones vs CIS which isn't a prob, however I'd like to amend the look of these teams slightly, bit more detail and for them to look as if they're actually in that enviroment, ie a bit sandy or dirty if they're fighting in the desert etc... I don't want to change the msh just the skin that covers it (which I can do in photoshop). Ok well on to the probs, first off I couldn't find the thread here that would give me a simple step by step guide as to how to do this, second, when looking through the assets of BFbuilder I couldn't find the clone side and I'm not 100% I've got CIS. Are the actual basic teams modable or do you have to copy them across to your DataWorld/sides folder and then amend the TGA's appropriately. Taking this step I assume would also mean changing one of the luas too or something wouldn't it?? Jeez I'm probably well over complicating this. Any help would be great. 
-
Leviathan
- Missing Jedi Admin
- Posts: 3277
- Joined: Fri Nov 12, 2004 2:54 pm
- Projects :: No Mod project currently.
- xbox live or psn: No gamertag set
RE: Skinning Sides
Clone side is named "REP" and is in the same path as "CIS"... (In the assets, so...) Next, you can only reskin and modify a side by copying it in the "Data[modid]\Sides" folder. But a *.LUA modifications is useless, except if you renamed *.REQ files... 
Hope it helps...
Hope it helps...
-
CarbineImpulse
RE: Skinning Sides
ok cheers for that, will give it a go
-
CarbineImpulse
RE: Skinning Sides
Ok, imported both CIS and REP into the correct sides folder using BFBuilder pro. Amended the image (put a red splat on it just as a test) for all the clones, localized, munged but still the same with no change to the skin in game, I'm obviously missing out something, altering part of a .req file or something although I couldn't see which req to change. also in the sides folder the teams are still called CIS and REP does this matter or would it cause some sort of conflict ?
-
Leviathan
- Missing Jedi Admin
- Posts: 3277
- Joined: Fri Nov 12, 2004 2:54 pm
- Projects :: No Mod project currently.
- xbox live or psn: No gamertag set
RE: Skinning Sides
This kind of problems has already occured for an other member here... (No solution has been found yet.) Anyway, you should see this topic.
Try to place your red splat on the droids (Inside the "CIS" side) and see if it works in-game for them...
Try to place your red splat on the droids (Inside the "CIS" side) and see if it works in-game for them...
-
Saturn_V
- Emperor's Hand
- Posts: 487
- Joined: Sun Dec 26, 2004 12:11 pm
- Projects :: No Mod project currently.
- xbox live or psn: No gamertag set
- Contact:
RE: Skinning Sides
Edit: See post below for walkthrough
Last edited by Saturn_V on Wed Jul 13, 2005 5:13 am, edited 1 time in total.
-
Leviathan
- Missing Jedi Admin
- Posts: 3277
- Joined: Fri Nov 12, 2004 2:54 pm
- Projects :: No Mod project currently.
- xbox live or psn: No gamertag set
RE: Skinning Sides
We do not know if he replaced shipped sides with his tweaked ones...
-
CarbineImpulse
RE: Skinning Sides
Saturn, I figured that having the 2 sets the called the same one in modded in dataworld/sides (modded version) and one as the shipped was what was probably what was causing the conflict. Ok now what I had done was in BFB pro selected import shipped sides and then imported CIS and REP. I then went into the copied tgas and added a red test splodge on the helmet of the tga. then I saved and munged. I possibly have gotten slightly muddled by Lev's comments above regarding .req and .lua changes (i've not really looked into luas and reqs yet).
Ok now if I want to start a fresh what do I need to do? I want to keep the teams identical (apart from skin) so I guess importing them was the right thing, Next to rename them, is this a simple case of changing the team folder name or more (almost certainly more I guess), the req's I've looked at don't seem to help much, maybe I'm looking at the wrong ones, the CW mission lua is massive and it's littered with REP and CIS comments all over the place and so I'm not sure what to amend or not. Sorry if all this is a pain in the arse.
Ok now if I want to start a fresh what do I need to do? I want to keep the teams identical (apart from skin) so I guess importing them was the right thing, Next to rename them, is this a simple case of changing the team folder name or more (almost certainly more I guess), the req's I've looked at don't seem to help much, maybe I'm looking at the wrong ones, the CW mission lua is massive and it's littered with REP and CIS comments all over the place and so I'm not sure what to amend or not. Sorry if all this is a pain in the arse.
-
Lord-Bandu
RE: Skinning Sides
once youv made your new side you need to put a "dc:" in the side part of the lua
-
Saturn_V
- Emperor's Hand
- Posts: 487
- Joined: Sun Dec 26, 2004 12:11 pm
- Projects :: No Mod project currently.
- xbox live or psn: No gamertag set
- Contact:
RE: Skinning Sides
First some preamble, then a tute:
Ok, the first thing I would recommend is not to use the import sides. What this does is import the whole of the side, including vehicles, weapons etc. This adds 80Mb to your project and makes your munge times much longer than they need to be. Only ever import the stuff you actually want to change, it will keep your munge times low and your sanity intact . The way I do it is to create a new side for each unit, as you can see in the screenshot here for my test map:
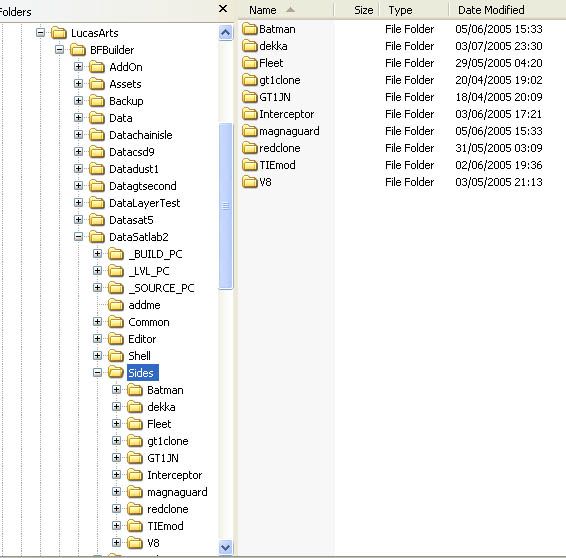
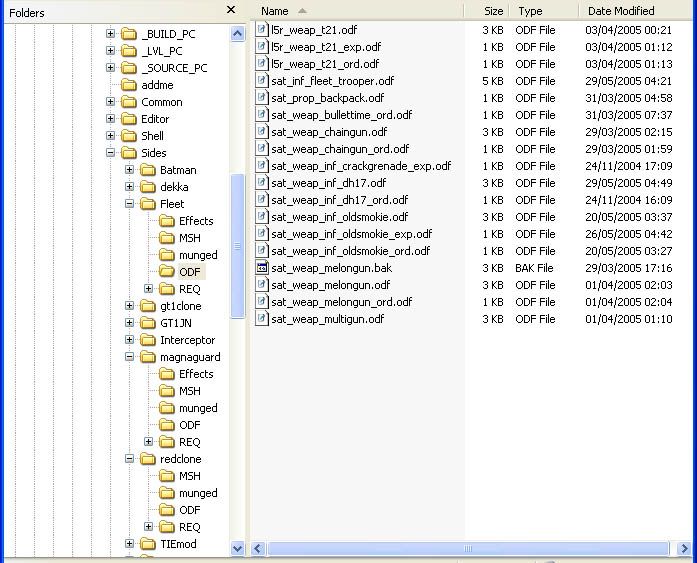
Here's a look inside one of the folders, a modded Rebel trooper. As you can see, I make a habit of renaming modded units to sat_type_unit so that they don't conflict with shipped assets and I can keep track of stuff easier...
But this isn't strictly suitable for what Carb wants to do given that he wants to mod all the units' textures - it'd be better to make a new Rep and CIS side (or even just one combined side for the new textures) and add in just the units.
Let's do a walkthrough of creating this stuff. I'll use Carbine's example of changing textures, but this'll apply to many situations. I'll assume that the project is to add new textures to each of the soldier units in both the clones and the CIS teams. The usual disclaimers apply, back up your work, some previous knowledge or use of the tools is useful, and above all RTFM. This is mostly text editing, so this tute is a big chunk of text which you may have to work through a couple of times to follow it.
Getting Started
What do I need to do to change the texture of a unit?
The texture call for a model is held in the msh file. To change the texture, you need to make a copy of the msh and it's assets in a new custom side, put your modded texture in place of the shipped one and then edit the msh to use your new texture. Msh files can be edited with a hex editor (search forum for recommendations if you don't have one already) - also see this thread for a nice picture of how different files fit together.
We'll go with making 2 new sides. Create the sides in BFB Pro, call them RepDirt and CISDirt.
Now we want to add the units to the custom sides. Which files do we need? One way to find out which files you need is to look at the unit loadouts in the mission lua.
The clone wars era .lua file has the following unit loadouts:
We'll start with the CIS. The first unit is cis_inf_battledroid, so find this odf file in Bfbuilder\Assets\Sides\CIS\ODF, copy and paste it to CISDirt\Sides\ODF and rename it to cisdirt_inf_battledroid.odf
All my files in the Assets folder are set as read only, so I get a message about renaming the file here. The files you copy into your custom sides will need to have read-only removed, so you can do this as you copy them in or do it en masse when all the files are copied over.
The odf for the battledroid will itself call a bunch of other files. The things that interest us here is the name of the msh (the 3D model geometry that appears in the game). If you want to mod the weapons, you'll need to look for the weapon calls and copy those assets over.
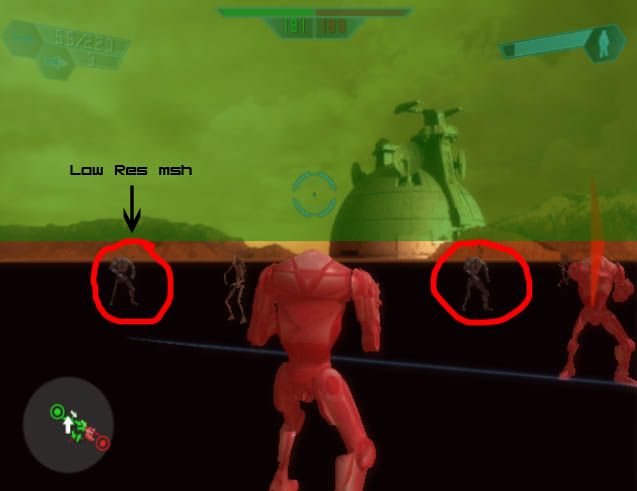
So you have to decide if your new texture is different enough to the original texture to have to change the low res model too. If you're changing colours, then yes, the low res needs to be changed too. In the case of dirtying up the texture, then seen at a distance it may not make a difference. That's an artistic decision you have to make.
We'll just deal with changing the main model, it's the same method for changing the low res version anyway.
So, we need to copy and paste cis_inf_sbdroid.msh to our projects' Sides\CISDirt\Msh folder. While you are grabbing that file, get the cis_inf_sbdroid.msh.option file too. Rename them to cisdirt_inf_sbdroid.msh and cisdirt_inf_sbdroid.msh.option
Now get your modded texture and put it in the Sides\CISDirt\Msh folder. Open cisdirt_inf_sbdroid.msh in a hex editor and search for .tga. This will reveal the name of the textures the superbattledroid uses. (Of course, you've already figured this bit out if you've altered the textures at this point, if not, that's how you find which ones to change. For the units, it's straightforward a sthey use one texture map each, but some buildings use several textures so if you wanted to remap the cloning centre that's how you can find all the textures). For the SBdroid, we find cis_inf_sbdroid.tga. You will need to change this filename, but you cannot change the number of characters in the filename so I'm going to change it in the hex editor to cisdirt_sbdroid.tga and then make sure you're altered texture is also called cisdirt_sbdroid.tga Find if the original texture had a .option file to go with it, if it does copy that to the msh folder and rename it to match your texture, so mine would be cisdirt_sbdroid.tga.option
Alright, that's the model set up with the new texture. Now we have to change the odf to use this altered model. Open cisdirt_inf_battledroid.odf and change
GeometryName = "cis_inf_sbdroid"
to
GeometryName = "cisdirt_inf_sbdroid"
Now we need to get it into the game to test it.
Take some time to have a look in the mod kit assets at the Jabba's Palace (TAT3) files. This is the template that shows us how to set up custom sides. in the case of Jabba, it's the Gamorreans. Here's where the Gam's assets are called:
Getting It In The Game
As you can see, you need to set up the .req file to call unit's odfs. Making a new side in BFB Pro has created a .req file, but it is blank. It has also created a REQ folder under sides, we will need to create req files here. We will use the shipped side's REQ as a guide to add what we need.
The shipped .req for the CIS side looks like this:
Here we have the first blocks of the new side. CISDirt.req will create CISDirt.lvl which will contain whatever is called in cisdirt_inf_basic.req
As we repeat the process for each unit, we add them to cisdirt_inf_basic.req and they are in turn added to the munged ide.
Adding the new units to the lua
Next we must add the new side to the lua. Open the CW era mission lua (you can do this from BFBuilder's menu or from windows explorer)
First we need to call our new unit's assets from the new side lvl, so add in the following:
ReadDataFile("dc:SIDE\\CISDirt.lvl",
"cisdirt_inf_basic");
thus:
The advantage is that by calling the shipped SBD, all his weapon assets are brought in for me, so I don't even need to add them to my custom side, saving file size and munge time. I used the same approach with the TIE Interceptor, calling a TIE fighter for the weapons.
Quick aside: If you want to mod a unit's weapons (eg, give him new weapons or change the performance of his existing ones) then you'll need to search the odfs and add all the necessary ones to your project. These are nested, so the unit's main odf will call, say, a rifle odf, which calls an ordnance odf... but the same trick applies- if you want to change the rate of fire but not the colour of the laser, continue calling the shipped unit and just mod the rifle odf)
Then we have to specify the new unit as part of the team in the unit loadout, so change
AddUnitClass(CIS, "cis_inf_battledroid",10)
to
AddUnitClass(CIS, "cisdirt_inf_battledroid",10)
giving you:
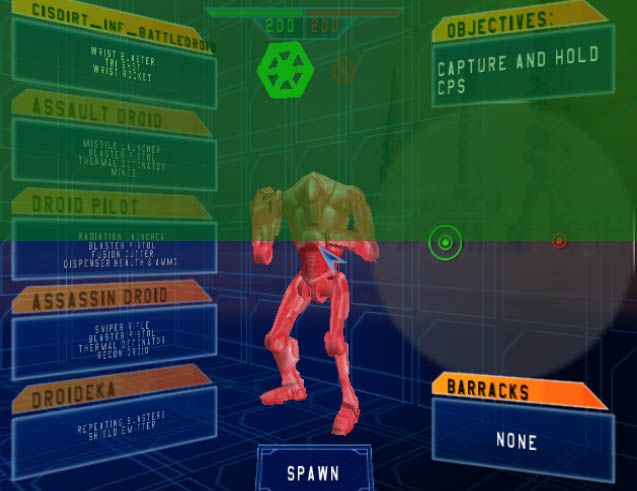
Clean, munge, copy to the Addon folder and run SPTest. All being well, a texture modded SuperBattledroid will be there. If not, note carefully any error messages SPTest gives you.
I found my biggest problem to be missing {} or spelling mistakes.
OK, if the SBdroid works, rinse and repeat for the other 9 units
It may seem difficult at first, but once you've done it a couple of times it gets easier, and if you are organised about it (do one team at a time, unit by unit, rename your modded assets sensibly etc) then you will soon be changing whole teams effortlessly.
I remember having similar problems when psych0fred posted the "Sides the Hard Way" tute, hehe, I think it was third time lucky on that one
Here's my effort, I just tinted the SBDroid's texture red/pink so it would show up as really obviously working; also in the second picture you can see the effect of not changing the low res version to match, ie it looks like a normal SBDroid.
This was a lot harder and more confusing to write down than to actually do the mod so I may need to edit in any corrections.
Good Luck, and May The Force Be With You
Ok, the first thing I would recommend is not to use the import sides. What this does is import the whole of the side, including vehicles, weapons etc. This adds 80Mb to your project and makes your munge times much longer than they need to be. Only ever import the stuff you actually want to change, it will keep your munge times low and your sanity intact . The way I do it is to create a new side for each unit, as you can see in the screenshot here for my test map:
Here's a look inside one of the folders, a modded Rebel trooper. As you can see, I make a habit of renaming modded units to sat_type_unit so that they don't conflict with shipped assets and I can keep track of stuff easier...
But this isn't strictly suitable for what Carb wants to do given that he wants to mod all the units' textures - it'd be better to make a new Rep and CIS side (or even just one combined side for the new textures) and add in just the units.
Let's do a walkthrough of creating this stuff. I'll use Carbine's example of changing textures, but this'll apply to many situations. I'll assume that the project is to add new textures to each of the soldier units in both the clones and the CIS teams. The usual disclaimers apply, back up your work, some previous knowledge or use of the tools is useful, and above all RTFM. This is mostly text editing, so this tute is a big chunk of text which you may have to work through a couple of times to follow it.
Getting Started
What do I need to do to change the texture of a unit?
The texture call for a model is held in the msh file. To change the texture, you need to make a copy of the msh and it's assets in a new custom side, put your modded texture in place of the shipped one and then edit the msh to use your new texture. Msh files can be edited with a hex editor (search forum for recommendations if you don't have one already) - also see this thread for a nice picture of how different files fit together.
We'll go with making 2 new sides. Create the sides in BFB Pro, call them RepDirt and CISDirt.
Now we want to add the units to the custom sides. Which files do we need? One way to find out which files you need is to look at the unit loadouts in the mission lua.
The clone wars era .lua file has the following unit loadouts:
This section basically lists the names of the odf files that are used in each team. Bingo. Note with the CIS, cis_inf_battledroid is the SuperBattleDroid, regular battledroids (seen in the Naboo historical level) are cis_inf_battledroid_inf. This gets a little confusing shortly, so bear it in mind.--start loadouts
SetTeamName(CIS, "CIS")
SetTeamIcon(CIS, "cis_icon")
AddUnitClass(CIS, "cis_inf_battledroid",10)
AddUnitClass(CIS, "cis_inf_assault",1)
AddUnitClass(CIS, "cis_inf_pilotdroid",2)
AddUnitClass(CIS, "cis_inf_assassindroid",2)
AddUnitClass(CIS, "cis_inf_droideka",1)
SetHeroClass(CIS, "cis_inf_countdooku")
SetTeamName(REP, "Republic")
SetTeamIcon(REP, "rep_icon")
AddUnitClass(REP, "rep_inf_clone_trooper",10)
AddUnitClass(REP, "rep_inf_arc_trooper",1)
AddUnitClass(REP, "rep_inf_clone_pilot",2)
AddUnitClass(REP, "rep_inf_clone_sharpshooter",2)
AddUnitClass(REP, "rep_inf_jet_trooper",1)
SetHeroClass(REP, "rep_inf_macewindu")
--end loadouts
We'll start with the CIS. The first unit is cis_inf_battledroid, so find this odf file in Bfbuilder\Assets\Sides\CIS\ODF, copy and paste it to CISDirt\Sides\ODF and rename it to cisdirt_inf_battledroid.odf
All my files in the Assets folder are set as read only, so I get a message about renaming the file here. The files you copy into your custom sides will need to have read-only removed, so you can do this as you copy them in or do it en masse when all the files are copied over.
The odf for the battledroid will itself call a bunch of other files. The things that interest us here is the name of the msh (the 3D model geometry that appears in the game). If you want to mod the weapons, you'll need to look for the weapon calls and copy those assets over.
GeometryName is the name of the msh for the unit. GeometryLowRes is another model, with less detail in it and a (usually) smaller texture file that is used for units that appear in the distance. This low res model has caused problems for people when they changed the texture of, say, the Arc trooper to the red texture and kept seeing a blue one when they were far away. Right there.GeometryName = "cis_inf_sbdroid"
GeometryLowRes = "cis_inf_sbdroid_low1"
SkeletonName = "cis_inf_sbdroid"
SkeletonLowRes = "cis_inf_sbdroid_lowres"
FirstPerson = "CIS\cissbdrd;cis_1st_sbdroid"
FirstPersonFOV = "70"
ThirdPersonFOV = "65"
AnimationName = "all_inf_snowtrooper"
So you have to decide if your new texture is different enough to the original texture to have to change the low res model too. If you're changing colours, then yes, the low res needs to be changed too. In the case of dirtying up the texture, then seen at a distance it may not make a difference. That's an artistic decision you have to make.
We'll just deal with changing the main model, it's the same method for changing the low res version anyway.
So, we need to copy and paste cis_inf_sbdroid.msh to our projects' Sides\CISDirt\Msh folder. While you are grabbing that file, get the cis_inf_sbdroid.msh.option file too. Rename them to cisdirt_inf_sbdroid.msh and cisdirt_inf_sbdroid.msh.option
Now get your modded texture and put it in the Sides\CISDirt\Msh folder. Open cisdirt_inf_sbdroid.msh in a hex editor and search for .tga. This will reveal the name of the textures the superbattledroid uses. (Of course, you've already figured this bit out if you've altered the textures at this point, if not, that's how you find which ones to change. For the units, it's straightforward a sthey use one texture map each, but some buildings use several textures so if you wanted to remap the cloning centre that's how you can find all the textures). For the SBdroid, we find cis_inf_sbdroid.tga. You will need to change this filename, but you cannot change the number of characters in the filename so I'm going to change it in the hex editor to cisdirt_sbdroid.tga and then make sure you're altered texture is also called cisdirt_sbdroid.tga Find if the original texture had a .option file to go with it, if it does copy that to the msh folder and rename it to match your texture, so mine would be cisdirt_sbdroid.tga.option
Alright, that's the model set up with the new texture. Now we have to change the odf to use this altered model. Open cisdirt_inf_battledroid.odf and change
GeometryName = "cis_inf_sbdroid"
to
GeometryName = "cisdirt_inf_sbdroid"
Now we need to get it into the game to test it.
Take some time to have a look in the mod kit assets at the Jabba's Palace (TAT3) files. This is the template that shows us how to set up custom sides. in the case of Jabba, it's the Gamorreans. Here's where the Gam's assets are called:
The important bit here is the dc:, this tells the game to look for downloadable content, ie a lvl file in Battlefront's AddOn folder. In this section, gam_inf_gamorreanguard is a req file that lists the odf files needed for the Gamorreran side (which in turn specify the models and weapons needed for each unit, yeah?)ReadDataFile("dc:SIDE\\gam.lvl",
"gam_inf_gamorreanguard")
Getting It In The Game
As you can see, you need to set up the .req file to call unit's odfs. Making a new side in BFB Pro has created a .req file, but it is blank. It has also created a REQ folder under sides, we will need to create req files here. We will use the shipped side's REQ as a guide to add what we need.
The shipped .req for the CIS side looks like this:
You can see this lists everything for the CIS side. These are calls for other .req files. These other .req files then call the odf files. This is crucial to understand when creating new sides. In the mission lua, under ReadDataFile, you will see it calls cis_inf_basic, which is a .req file that is the standard CIS side. Look under the REQ folder for cis_inf_basic.requcft
{
REQN
{
"lvl"
"cis_fly_maf"
"cis_fly_droidfighter"
"cis_fly_droidfighter_dome"
"cis_fly_fedcoreship_dome"
"cis_fly_fedlander_dome"
"cis_fly_geofighter"
"cis_fly_techounion_dome"
"cis_hover_aat"
"cis_hover_mtt"
"cis_hover_stap"
"cis_inf_basic"
"cis_inf_basic_battledroids"
"cis_inf_countdooku"
"cis_inf_droideka"
"cis_tread_hailfire"
"cis_walk_spider"
}
}
The droideka is not called here as it is a special case of walker, but the sbdroid, rocket droid, sniper and pilot are here. The files listed in this req are the names of the odf files. So, to test our first droid, we will follow the shipped side format and create a new req file called cisdirt_inf_basic.req This is a blank text file (eg, right click in explorer, New>Text Document), create it in Sides\CISDirt\REQ and type in this text:ucft
{
REQN
{
"class"
"cis_inf_battledroid"
"cis_inf_assault"
"cis_inf_assassindroid"
"cis_inf_pilotdroid"
}
}
Now the CISDirt.req file needs to be filled out to call this req. Open the CISDirt.req file (the blank one BFB created under Sides\CISDirt) and fill it in like this:ucft
{
REQN
{
"class"
"cisdirt_inf_battledroid"
}
}
ucft
{
REQN
{
"lvl"
"cisdirt_inf_basic"
}
}
Here we have the first blocks of the new side. CISDirt.req will create CISDirt.lvl which will contain whatever is called in cisdirt_inf_basic.req
As we repeat the process for each unit, we add them to cisdirt_inf_basic.req and they are in turn added to the munged ide.
Adding the new units to the lua
Next we must add the new side to the lua. Open the CW era mission lua (you can do this from BFBuilder's menu or from windows explorer)
This section is where the assets are loaded in for the game. It's a list of the req files that call the various units and vehicles. So cis_inf_basic is used to call 4 of the droid units, as discussed in the req section previously.-- Start sidelvls
ReadDataFile("SIDE\\cis.lvl",
"cis_inf_basic",
"cis_inf_countdooku",
"cis_inf_droideka");
ReadDataFile("SIDE\\rep.lvl",
"rep_inf_basic",
"rep_inf_macewindu",
"rep_inf_jet_trooper");
--end sidelvls
First we need to call our new unit's assets from the new side lvl, so add in the following:
ReadDataFile("dc:SIDE\\CISDirt.lvl",
"cisdirt_inf_basic");
thus:
An important point here: I'm still calling the shipped CIS units, including the SBDroid. Note this is different to my previous post, but because we have renamed the units now, they are essentially a different unit and no longer conflict with shipped ones).-- Start sidelvls
ReadDataFile("SIDE\\cis.lvl",
"cis_inf_basic",
"cis_inf_countdooku",
"cis_inf_droideka");
ReadDataFile("SIDE\\rep.lvl",
"rep_inf_basic",
"rep_inf_macewindu",
"rep_inf_jet_trooper");
ReadDataFile("dc:SIDE\\CISDirt.lvl",
"cisdirt_inf_basic");
--end sidelvls
The advantage is that by calling the shipped SBD, all his weapon assets are brought in for me, so I don't even need to add them to my custom side, saving file size and munge time. I used the same approach with the TIE Interceptor, calling a TIE fighter for the weapons.
Quick aside: If you want to mod a unit's weapons (eg, give him new weapons or change the performance of his existing ones) then you'll need to search the odfs and add all the necessary ones to your project. These are nested, so the unit's main odf will call, say, a rifle odf, which calls an ordnance odf... but the same trick applies- if you want to change the rate of fire but not the colour of the laser, continue calling the shipped unit and just mod the rifle odf)
Then we have to specify the new unit as part of the team in the unit loadout, so change
AddUnitClass(CIS, "cis_inf_battledroid",10)
to
AddUnitClass(CIS, "cisdirt_inf_battledroid",10)
giving you:
--start loadouts
SetTeamName(CIS, "CIS")
SetTeamIcon(CIS, "cis_icon")
AddUnitClass(CIS, "cisdirt_inf_battledroid",10)
AddUnitClass(CIS, "cis_inf_assault",1)
AddUnitClass(CIS, "cis_inf_pilotdroid",2)
AddUnitClass(CIS, "cis_inf_assassindroid",2)
AddUnitClass(CIS, "cis_inf_droideka",1)
SetHeroClass(CIS, "cis_inf_countdooku")
SetTeamName(REP, "Republic")
SetTeamIcon(REP, "rep_icon")
AddUnitClass(REP, "rep_inf_clone_trooper",10)
AddUnitClass(REP, "rep_inf_arc_trooper",1)
AddUnitClass(REP, "rep_inf_clone_pilot",2)
AddUnitClass(REP, "rep_inf_clone_sharpshooter",2)
AddUnitClass(REP, "rep_inf_jet_trooper",1)
SetHeroClass(REP, "rep_inf_macewindu")
--end loadouts
Clean, munge, copy to the Addon folder and run SPTest. All being well, a texture modded SuperBattledroid will be there. If not, note carefully any error messages SPTest gives you.
I found my biggest problem to be missing {} or spelling mistakes.
OK, if the SBdroid works, rinse and repeat for the other 9 units
It may seem difficult at first, but once you've done it a couple of times it gets easier, and if you are organised about it (do one team at a time, unit by unit, rename your modded assets sensibly etc) then you will soon be changing whole teams effortlessly.
I remember having similar problems when psych0fred posted the "Sides the Hard Way" tute, hehe, I think it was third time lucky on that one
Here's my effort, I just tinted the SBDroid's texture red/pink so it would show up as really obviously working; also in the second picture you can see the effect of not changing the low res version to match, ie it looks like a normal SBDroid.
This was a lot harder and more confusing to write down than to actually do the mod so I may need to edit in any corrections.
Good Luck, and May The Force Be With You
Last edited by Saturn_V on Wed Jul 13, 2005 5:19 am, edited 2 times in total.
-
CarbineImpulse
RE: Skinning Sides
[DEL]
Last edited by CarbineImpulse on Wed Jul 13, 2005 4:49 am, edited 1 time in total.
-
Saturn_V
- Emperor's Hand
- Posts: 487
- Joined: Sun Dec 26, 2004 12:11 pm
- Projects :: No Mod project currently.
- xbox live or psn: No gamertag set
- Contact:
RE: Skinning Sides
[del]
Last edited by Saturn_V on Thu Jul 14, 2005 10:28 am, edited 4 times in total.
-
CarbineImpulse
RE: Skinning Sides
[DEL]
Last edited by CarbineImpulse on Wed Jul 13, 2005 4:49 am, edited 1 time in total.
-
CarbineImpulse
RE: Skinning Sides
[DEL]
Last edited by CarbineImpulse on Wed Jul 13, 2005 4:50 am, edited 1 time in total.
-
Saturn_V
- Emperor's Hand
- Posts: 487
- Joined: Sun Dec 26, 2004 12:11 pm
- Projects :: No Mod project currently.
- xbox live or psn: No gamertag set
- Contact:
RE: Skinning Sides
[del]
Last edited by Saturn_V on Wed Jul 13, 2005 5:15 am, edited 1 time in total.
-
CarbineImpulse
RE: Skinning Sides
[DEL]
Last edited by CarbineImpulse on Wed Jul 13, 2005 4:51 am, edited 1 time in total.
-
Saturn_V
- Emperor's Hand
- Posts: 487
- Joined: Sun Dec 26, 2004 12:11 pm
- Projects :: No Mod project currently.
- xbox live or psn: No gamertag set
- Contact:
RE: Skinning Sides
Check your PM
Edit: mods, can you remove this post and all the ones marked [del] above ? Ta
Edit: mods, can you remove this post and all the ones marked [del] above ? Ta